Thursday, March 29, 2012

Mini Corn Dog Muffins


 All the goodness of the State Fair, wrapped up in a neat little package.  Nowhere near the mess of making actual corn dogs at home and kid (and mommy)-pleasing to boot!  These would make a great party food (or game food--Final Four games this weekend, how many brackets are totally busted?), but are equally appropriate at lunchtime.  Since the leftovers reheat quite nicely, they may even work for both purposes.  

Mini Corn Dog Muffins
1 recipe My Favorite Cornbread batter (see below)
1 package favorite hot dogs (I used Hebrew National Brand reduced fat hot dogs)
cooking spray
ketchup and mustard for serving

Directions:
Preheat oven to 400 degrees.  Grease a mini muffin tin with cooking spray.  Prepare corn bread batter according to directions below.  Cut hot dogs into 1"-2" pieces (I cut each Hebrew National hot dog into 4-5 pieces).  Spoon about 1 tablespoon cornbread batter into each muffin cup.  Press hot dog piece into each muffin cup until completely covered by the batter.  Repeat until all muffin cups are full.  Bake at 400 for 15-17 minutes or until mini corn dog muffins are golden brown.  Remove from oven and cool slightly before serving.  Dip in ketchup and mustard.

Variation: You can also make full size corn dog muffins, just place 3 hot dog pieces into each regular muffin cup and bake for 18-20 minutes or until corn dog muffins are golden brown.
  
My Favorite Cornbread Recipe (adapted from Betty Crocker)
1 cup milk
6 tablespoons butter butter, melted and cooled slightly
1 large egg
1 1/4 cups yellow cornmeal
1 cup all-purpose flour
1/2 cup sugar
1 tablespoon baking powder
1/2 teaspoon salt

Heat oven to 400 degrees.  Combine dry ingredients and set aside.  Beat milk and egg in a large bowl with a beater.  Stir in melted butter and stir into wet ingredients.  Add dry ingredients and stir just until combined.  Use batter for corn dog muffins as above (or for regular cornbread, bake in a cast iron skillet or baking dish with extra melted butter in the bottom at 400 degrees for 20-25 minutes or until golden brown and toothpick comes out clean). 

Friday, March 16, 2012

Oven-Fried Onion Rings


In the past couple of weeks, I think I've learned a valuable lesson.  I come to realize it's best to avoid saying such phrases as "I feel like things are finally settling down" or "As soon as we get through this, I'll really be more on top of things."  Silly me, this week has been one big reminder that we are not in control.  And so the craziness continues.

That said, I felt like I couldn't delay any longer in sharing this recipe.  I ate so many of these onion rings that I had no room for any of the other items on my plate and kept eating even after I got stomach ache from being so full.  They were perfect crispy-crunchy thick-cut onion rings that my husband, a self-proclaimed onion ring-lover, declared some of the very best he'd ever had.  And, he pointed out, they don't have that distinctly fried aftertaste that a lot of onion rings have.


Oven-Fried Onion Rings
1/2 cup all-purpose flour
2 tablespoons corn starch
1 large egg, at room temperature
1/2 cup buttermilk, at room temperature*
1/2 teaspoon table salt
1/4 teaspoon ground black pepper
1/4 teaspoon cayenne pepper
30 saltine crackers
4 cups kettle-cooked potato chips (I used reduced fat Ruffles brand and they worked great)
2 large yellow onions, cut into large rings
6 tablespoons vegetable oil

Adjust the oven racks to lower-middle and upper-middle positions and heat the oven to 450 degrees. 

Place 1/4 cup of the flour and corn starch in a shallow baking dish or pie plate.  Beat the egg and buttermilk in a medium bowl.  Whisk the remaining flour, salt, black pepper and cayenne pepper into the buttermilk mixture.  Pulse the saltines and chips together in a food processor until finely ground (or just place in a gallon-sized freezer zipper bag and pound the heck out of them).  Place crumb mixture in a separate baking dish.

Working one at a time, dredge each onion ring in the flour-cornstarch mixture, shaking off the excess.  Dip in the buttermilk mixture, allowing the excess to drip back into the bowl, then drop in the crumb coating, turning the ring over to coat evenly.  Transfer to a large place. (At this point, the onion rings can be refrigerated for up to 1 hour.  If you refrigerate them, let them sit at room temperature for 30 minutes before baking).

Pour 3 tablespoons of the oil on each of two rimmed baking sheets.  Place in the oven and heat until just smoking, about 8 minutes.  Carefully tilt the heated sheets to coat evenly with the oil, then arrange the onion rings on the sheets.  Bake, flipping the onion rings over and watching and rotating the position of the baking sheets halfway through baking, until golden brown on both sides, about 15 minutes.  Briefly drain the onion rings on paper towels.  Serve immediately. 

Note:
*If you do not have buttermilk, an easy substitute can be made.  Just mix together slightly less than 1/2 cup milk with 1 1/2 teaspoons lemon juice or white vinegar.  Allow mixture to sit for 5 minutes and stir before using. 
Recipe slightly adapted from: The Complete America's Test Kitchen TV Show Cookbook 2001-2011

Monday, March 5, 2012

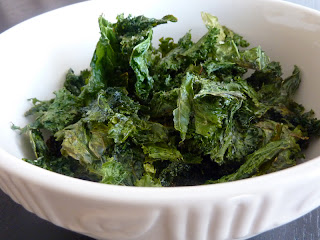
Baked Kale Chips


Some people may try to tell you that these are a great substitute for potato chips.  Much like the baked doughnuts recipe I found on Pinterest is no substitute for Krispy Kreme, these are should not be compared to potato chips in my book.  That said, unlike the baked doughnuts (really, how can you beat a Krispy Kreme doughnut when they hand you one hot off the conveyor belt?), I might actually like Kale Chips better than their potato counterparts.  You heard me right.  Kale chips are tasty and crazily addictive. 

We all need to find more opportunities to get more produce in our diet and I've been especially aware of that lately.  Even though in "real life" (read: not pregnant) I eat more (and enjoy!) broccoli and spinach than most everyone I know, "Pregnant Me" has a hard time stomaching the thought of green things.  I know a lot of people who feel that way all the time, so I can feel their pain in the struggle to "eat our veggies."

Thankfully, these kale chips have been a really great way to get some of those vegetable servings in.  I actually even have to fight my two munchkins for them.  It's a good thing they're so fast and easy to make.

A quick word to the wise, though.  Make sure to check your teeth before leaving the house after eating.  I'm just saying...


Baked Kale Chips
1 bunch kale
2 tablespoons olive oil
coarse salt to taste

Preheat the oven to 350 degrees.  Remove kale leaves from stems and tear into bite sized pieces.  Wash and dry thoroughly (this is a place where a salad spinner really comes in handy).  Drizzle kale pieces with olive oil and toss to coat thoroughly.  Spread in an even layer on a cookie sheet (using two if necessary).  Sprinkle lightly with salt.  Bake until the edges begin to brown and kale becomes crisp but not burnt (10-15 minutes). 

Approved by these two Yahoos.

Recipe adapted from All Recipes