Tuesday, January 25, 2011

Shrimp Lo Mein


"They"--whoever "they" may be--say that necessity is the Mother of Invention.  That would sum up tonight's dinner.  It's approaching the end of the month and therefore, my grocery budget for January has been used up.  Time to get creative and also to use up the odds and ends that are in the fridge and pantry.  What did I have?  Some frozen shrimp, some random veggies, soy sauce...time for stir fry.  Except, I had no rice.  Oops.  What I did have, however, was a box of spaghetti and thus, a stir fry morphed into lo mein.  And, my noodle-loving boys were happier because of it!  Feel free to use this recipe as a springboard to use up what you have on hand--you can substitute a different kind of meat and use up just about any random vegetables that you have threatening to languish in the crisper drawer.

Shrimp Lo Mein
1/2 box (about 8 oz) long shaped pasta (I used a 14.5 oz box of "Ronzoni Smart Taste" thin spaghetti)
1/2 pound medium shrimp, peeled, de-veined and de-tailed
4 tablespoons soy sauce, divided
3 tablespoons sesame oil or combination of vegetable and sesame oil, divided
4 cups desired vegetables, cut into bite-sized pieces (we used broccoli florets, thin sliced red bell    pepper, shredded cabbage and 1/2 a bag of frozen stir fry blend)
1 tablespoon fresh ginger, peeled and minced (about 1" chunk)
3 garlic cloves, peeled and minced (about 1 tablespoon)
1/4 cup green onions (white and green parts), thinly sliced (about three green onions)
1/2 cup chicken broth
optional: 1/2-1 cup leftover cooked meat (i.e. chicken breast or pork--we used leftover pork tenderloin)

In a small bowl, toss shrimp with 1 tablespoon soy sauce.  Set aside until ready to stir fry.  Prepare pasta according to package directions.  Drain, toss with 1 teaspoon sesame oil and set aside.  In a large skillet or wok pan over high heat, heat 2 teaspoons oil.  Stir fry vegetables, in batches and adding chicken broth one tablespoon at a time as needed (for example, sturdier vegetables like broccoli and carrots may benefit from the extra moisture to cook more quickly) until vegetables are crisp tender.  Remove vegetables from pan, set aside and repeat with remaining vegetables until all are stir fried.  Heat one additional tablespoon of oil.  Add ginger, garlic and green onions and stirring constantly, cook until fragrant (about 30 seconds to one minute).  Add shrimp and stir fry one additional minute.  Add remaining chicken broth and soy sauce and bring to a boil.  Add pasta and vegetables back into the pan and toss to coat until heated through.  Drizzle with remaining tablespoon of sesame oil and any additional soy sauce to taste.  Serve immediately.  Chop sticks optional.

Monday, January 24, 2011

Artichoke and Pesto "Stuffed" Shells Bake

This dish was inspired by a favorite recipe of mine that comes from one of my Cooking Light Cookbooks (apparently, December 2007 was a very good month because there are several recipes that are stand outs in my book).  Anyway, after a lot of substitutions and shortcuts, this really became its own creation.  The original version called for large shells that you stuff individually (a bit time consuming for a weeknight dinner, so I substituted a box of medium shells--they do not have to be relegated to mayonnaise-filled seafood salads anymore!).  And, because I find many Italian dishes are improved by ricotta cheese and pesto, I worked those in there as well.  I divided the recipe into two batches and froze half, but by the time we were actually eating, I thought it might have been smarter just to serve the whole thing as all three of my boys went to town on it and not a bit remained.  It was a family hit! 

Artichoke and Pesto "Stuffed" Shells Bake
serves 6-8
1 16 oz. package dried medium shells pasta (or other desired shaped pasta)
1 24 oz jar marinara sauce (any tomato based pasta sauce would be fine)
1/4 cup chopped pepperoncini*
1 6.5 oz. jar marinated artichoke hearts, drained and chopped
1 15 oz. container ricotta cheese (I use low fat, part skim)
1/4 cup + 2 tablespoons grated Parmesan cheese
1/4 cup crumbled feta cheese
1 cup shredded mozzarella cheese, divided
1 teaspoon garlic powder
a large pinch of ground nutmeg (about 1/8 teaspoon)
1/4 cup basil pesto sauce

*Pepperoncini are those little yellow-green peppers that are found in sitting off to the side in a Papa John's pizza box or on top of salads at the Olive Garden.  In stores, they can be found in jars by the olives.  They have a bit of a spicy kick and add a bit of zest to the pasta sauce but the amount is not enough to make the sauce actually spicy (feel free to adjust up or down in quantity based on your preference, however).

Directions: Prepare pasta according to package directions cooking until tender yet still firm (al dente).  Drain and set aside.  Preheat oven to 375 degrees.  In pot used to cook pasta shells, combine marinara sauce and pepperoncini.  Bring to a simmer over medium heat, reduce heat to low and keep warm.  In a large bowl, combine remaining ingredients (reserve 1/2 cup shredded mozzarella and 2 tablespoons Parmesan cheeses for topping) and stir until well combined.  Add cooked pasta and stir well to coat.  Transfer to a 9x13 glass baking dish that is coated with non-stick cooking spray (or you can divide split it into two smaller dishes to save a meal for later or to bring to a friend).  Spread marinara sauce mixture evenly over top of pasta.  Sprinkle with remaining cheeses.  Bake at 375 degrees for about 20-30 minutes or until pasta is heated through (will be bubbling around sides) and cheese on top is browned.  Add a salad and dinner is served!


*Also, if I'd had it on hand, I would've added some chopped frozen spinach (thawed and drained) to the cheese mixture as well.  Alas, I was out this time but I highly recommend including some to add color and extra nutrition to the dish!
Inspired by Artichoke, Spinach and Feta Stuffed Shells from Cooking Light

Sunday, January 23, 2011

Chicken Noodle Soup


When I was young and feeling sick, Campbell's Chicken and Stars soup was the ultimate comfort.  We have all been fighting colds in our house this week.  Bleck.  No offense to those sweet little mushy stars and odd bits of chicken, but I'm grown up now and need a different chicken soup.  This version has all white meat chicken (I'm kind of picky when it comes to proteins), rustic homemade egg noodles and broth scented by rosemary and thyme.  Exactly what the doctor ordered.  For all others who are battling yucky viruses this time of year (or even if you're not and just want something warm and satisfying), give this remedy a try...

*Also, if you want to speed the process even further, you can skip the step to make the homemade egg noodles and buy a package of ready-made egg noodles in the freezer section.  Reames is a brand that was a staple in my house growing up and I highly recommend.  They made up such a significant portion of my younger brother's diet that a more basic version of this soup (very similar to my "Sick Day Chicken Soup") has become known as "Luke Soup" in my family's house .
  
Chicken Noodle Soup
makes a huge pot
1 1/2 pounds boneless skinless chicken tenders (or chicken breast)
2 teaspoons steak seasoning
1 tablespoon vegetable oil 
8 cups chicken stock (2 quarts)
1 large pinch (about 1/2 teaspoon) dried thyme
1 large pinch (about 1/2 teaspoon) dried rosemary
1 recipe homemade egg noodles (see below) or 1 pound package frozen egg noodles
1/2 cup finely diced celery
1 cup diced carrots
1 cup frozen peas
salt and freshly ground black pepper to taste

Directions:
Trim chicken of any "icky bits" if necessary.  Sprinkle with steak seasoning.  Heat oil in a large pot over medium high heat.  Brown chicken on both sides, in batches if needed.  Return all the browned chicken to the pot.  Slowly add chicken stock to the pot stirring to incorporate any browned bits off of the bottom of the pot.  Bring broth and chicken to a boil, reduce heat to medium low and simmer until chicken is cooked through.  Remove chicken from broth and allow it cool enough to handle.  Shred cooked chicken into bite sized chunks (again removing any "icky bits") and return to pot.  Add thyme and rosemary.  Bring back to a boil and add noodles, celery and carrots.  Reduce heat to medium and gently boil until carrots and celery are tender and noodles are cooked through (about 10 minutes).  Add peas, stir to combine and season with salt and pepper to taste. 

Egg Noodles
2 cups all purpose flour
2 teaspoons salt
2 egg yolks
2 whole eggs
1/4 to 1/2 cup water

In a medium bowl, stir together flour and salt until well combined.  Make a well in the middle of the flour mixture and add egg yolks and eggs.  Mix thoroughly.  Add water, 1 tablespoon at a time until dough is stiff, but well combined.  It will be kind of sticky and shaggy (lumpy)  Turn dough out onto a floured surface and knead for a couple of minutes or until dough becomes smooth and firm but pliable.  Divide dough into four equal pieces.  Take one chunk of dough at a time (covering the remaining pieces) and on a floured surface, roll out into a rectangle until desired thickness (1/4-1/8 inch).  Loosely fold the rolled dough into thirds and cut into desired width (1/4-1/2 inch wide, and a pair of kitchen shears can help with this process).  Separate cut noodles and spread out on a floured surface in a single layer.  Allow to dry in the open air for at least 30 minutes.  Repeat with remaining pieces of dough.

Sunday, January 16, 2011

Homemade Pizza Party


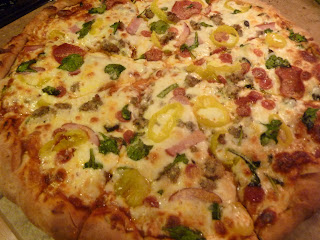
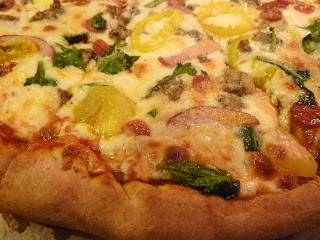
My one year old son adores pizza above almost anything else.  Adores it.  Like "can eat two full slices (torn into bite-sized pieces) in one sitting" adores it.  And if any of said pizza pieces find themselves fallen to the floor or in the crevices of his highchair, you can bet that he will be trying to swipe them up and shovel them into his mouth before I can get them cleaned up.  Therefore, we knew it was a must to have pizza for his Birthday.  We served "build your own mini English muffin pizzas" for his Birthday/dedication with our church family (a fun idea in themselves: just toast the muffins a little beforehand, top with sauce, cheese and desired toppings and bake until cheese is melted and browning!) and after the last English muffin was consumed and all the cake crumbs were swept up, we still had a lot of toppings remaining.  To use them up, I made one with "The Works" (pictured: pepperoni, chicken sausage, ham, spinach, banana peppers, mushrooms, black olives, green peppers and red onions).


Making your own pizza really is easy and it's nice to be able to control the quality and quantity of your toppings (no getting charged $2 for extra cheese and getting to adorn your pizza with organic chicken basil sausage? Yes, please!).  Also, it can be cranked out pretty quickly!  Letting the dough rest will really improve the texture and the workability, but you can assemble the pizza as soon as the dough is formed if you're in a rush.  Also, it won't hurt my feelings if you want to try some not-so-run-of-the- mill combinations (listed below) on a pre-made crust.  Any way you slice it up, who doesn't love pizza?


Homemade Pizza Dough
makes 1 12-16” pizza, depending on thickness
2-2 1/2 cups flour (can use up to half whole wheat and up to 1/2 cup corn meal)
1 envelope quick rise yeast (or 2 1/4 teaspoons)
1 teaspoon sugar or honey
6-8 oz. warm water (around 110 degrees)
2 Tablespoons olive oil
2 teaspoons Kosher salt
Optional: 1 tsp. herbs or garlic

    In a glass measuring cup, add yeast and sugar to warm water.  Stir and allow to sit for about 5 minutes to proof (it will grow in volume and be bubbly).  Meanwhile, in a food processor or stand mixer, blend together flour, salt and olive oil (and herbs, if using).  While processor is running, pour in water-yeast mixture and continue to process until a solid ball of dough is formed (you may have to add a little more flour or water).  Allow to run 30 seconds more.  Turn off machine and pull out dough.  Place in a greased bowl and cover with a dish towel or greased plastic wrap.  Allow to sit at least 30 minutes.  Punch down dough and turn in on itself a few times. 
    Preheat oven to 500 degrees.  When ready to assemble, on a well-floured surface, roll out dough to desired size and thickness.  Transfer to pizza stone or pan sprayed with cooking spray and dusted with cornmeal.  Drizzle 1-2 Tablespoons olive oil around edge of dough and brush oil over surface of the unbaked crust, focusing on the edges.  Top with desired sauce and toppings.  Bake at 500 degrees for 9-13 minutes or until golden brown and cheese is bubbly. 

Pizza Suggestions:
BBQ Chicken Pizza: Made famous by California Pizza Kitchen...
    Mix together equal parts barbeque sauce and pizza sauce and spread on crust.  Top with cooked shredded chicken.  Use combination of mozzarella and provolone cheese (use smoked if you can find it for extra flavor).  Sprinkle diced red onion on top of cheese.  Bake 10-12 minutes or until golden brown.  Once out of oven, scatter chopped cilantro over the top. 

Taco Pizza: I had no idea this combination existed until a I moved to Iowa.  You really haven't lived until you've tried a Casey's Taco Pizza (or so my husband would say!). 
    Use cornmeal variation on crust.  Spread refried beans and salsa or taco sauce on dough.  Add cooked taco meat, if desired.  Top with mixture of mozzarella and cheddar cheeses.  Bake 10-12 minutes or until golden brown.  Once out of the oven, top with shredded lettuce and crushed nacho cheese flavored tortilla chips (i.e. "Doritos" no one said this was very authentic!).  Pass more taco sauce for additional spice.

Balsamic Salad Pizza: My husband's former youth pastor and his wife made this combination and I nearly fell over it was so good.  It looks really classy, too.  Perfect for a book club meeting!    
     Omit pizza sauce.  Drizzle additional olive oil over entire pizza.  Sprinkle 1 teaspoon Italian seasoning and 1/2 teaspoon garlic powder over top.  Use Italian cheese blend (mozzarella, provolone, Parmesan, etc.).  Bake until golden brown (8-11 minutes).  Top with 3 cups baby salad greens tossed with 1/4 cup balsamic vinaigrette. Sprinkle crumbled feta cheese over top.
   
Easy Balsamic Vinaigrette:
    4 tablespoons balsamic vinegar
    pinch of salt
    1 teaspoon Dijon mustard
    2-4 tablespoons olive oil
   1/4 teaspoon garlic powder
    fresh ground black pepper to taste
Combine all ingredients in a plastic container with a lid.  Shake vigorously until ingredients are combined.  Taste and adjust seasonings if needed.  Shake again immediately before using. 

Chicken, Canadian Bacon and Green Olive (with red sauce): My brother, Peter, worked as a delivery guy for a Minnesota pizza chain, Davanni's (Pizza AND Hot Hoagies), and he would bring home pizzas with this combination.  Fantastic.

Pepperoni and Banana Pepper (red sauce)s: Buca di Beppo's has it right on this combination...Paired with a red wine (try a Sangiovese)...heaven!

Pineapple and Black Olives (red sauce): don't knock it till you try it, I was introduced to this combination in high school by a dear friend, Abigail, and it is really good.  It's something about that salty-sweet combination...

p.s. I know this is a really looonnngg post, but I just wanted to share a sweet pizza memory from my life.  When my (now)husband and I were dating, we went out on a date for pizza.  I love vegetarian pizzas and especially love black olives.  Jay, my husband and previous olive-hater, happily ate a vegetarian pizza with black olives on our date and told his mom that he had had pizza with black olives and that they were actually pretty good.  And, that, dear friends, is the moment my now mother-in-law knew that her son with in love because he ate olives on his pizza for me.  : )

Thursday, January 13, 2011

Chocolate Chip Cheese Ball Dip


What can I say?  Miniature chocolate chips are really good.  They made an appearance in the Chocolate Chip Cookie Dough Truffles and since I had quite a few leftover, I felt the need to recreate a recipe for a chocolate chip cheese ball that my dear friend, Angie, had introduced me to over the holidays.  In my mind, chocolate chips = good, and chocolate chips + cream cheese = great!  Really, what isn't improved by the addition of cream cheese?  I put this together for my baby's First Birthday and it was a hit!  * A quick note, you can adjust the amount of powdered sugar and butter depending on if you prefer a less sweet, more dip-like consistency (that would be me, especially on a day I knew I would be eating ) or if you would like to be able to form it into an indulgent, traditional-looking cheese ball.

Chocolate Chip Cheese Ball Dip
12 oz (1 1/2 packages) reduced fat (Neufchatel) cream cheese, softened
2 tablespoons softened butter (go crazy and use up to a 8 tablespoons for a richer taste and sturdier consistency)
1/4 cup light brown sugar
1/4-1/2 cup powdered sugar (to taste, see note above*)
1/2 teaspoon vanilla extract
3/4 cup miniature chocolate chips
 If you're rolling the cheese ball, 1 cup finely ground pecans or crushed chocolate graham cracker or cookie crumbs

For dipping, graham or animal crackers (chocolate are especially good--I found a HUGE bag of Stauffer's brand chocolate animal crackers for $1.99!), pretzel sticks or apple slices

Directions:
In a medium mixing bowl, combine butter and cream cheese and beat until light and fluffy.  Add vanilla extract and brown sugar and mix until well-combined.  Slowly add powdered sugar in small increments, beating after each addition and tasting for desired sweetness.  Stir in chocolate chips.  Cover with plastic wrap and allow to chill thoroughly.  Can spoon it into a bowl and serve with dippers at this point.

-or-

If you would like to form it into a ball, place cookie crumbs or ground nuts on a large plate.  Use well-greased hands to form chocolate chip mixture into a ball (it may still be soft and messy, but that's okay).  Transfer to plate and roll around in the crumbs (can also pat them on) until well covered.  Move the cheeseball to a serving plate and keep chilled until ready to serve. 

And, because who doesn't love a picture of a baby enjoying Birthday cake (ok, maybe that's just me...):
Happy 1st Birthday, Judah Bubba Doo!

Wednesday, January 12, 2011

Tamale Pie


Well, after the toothache we must all have after eating a whole bowl of cookie dough from the last post, I thought I would post something healthier.  I really love making this tamale pie because it's really more one of those concept recipes--meaning it's easy to vary the filling based on what you have on hand.  What makes the "tamale" part is a soft polenta made from regular, old cornmeal.  Then, the filling possibilities are endless--taco meat, shredded beef, refried beans, fajita style chicken, you get the picture... For this particular night, I made a vegetarian version filled with black beans and green chiles to pair with some really delicious Chicken Green Chile sausages I picked up (thank you, new Sunflower Market, for opening up right near my Thursday morning Bible study!). 


Tamale Pie (Black Bean variation)

Polenta
3 cups water
1 cup milk
1 teaspoon chicken base (I love "Better than Bouillon" brand--or bouillon cube)
1 cup yellow corn meal (the kind you make cornbread with)
1 1/2 cups shredded cheddar or Mexican blend cheese, divided

Black Bean Filling:
1 15 oz. can black beans, rinsed and drained
1 15 oz. can diced tomatoes with green chiles (or 1 can Rotel), drained (or substitute salsa)
1 teaspoon cumin
1 teaspoon chile powder
1/2 cup (or one small can) diced green chiles

Garnishes as desired: shredded lettuce, diced tomato, sour cream, diced avocado, chopped cilantro, black olives, jalapenos, etc.

Directions:
Preheat oven to 400 degrees F.

To prepare filling, combine all ingredients in a sauce pan and bring to a boil.  Reduce heat to low and allow to simmer, stirring occasionally and keeping warm while preparing the polenta. 

To prepare the polenta, in a medium sauce pan bring water, milk and chicken base or bouillon cube to a boil (watch it very carefully as it will boil over very quickly with that milk in it.  I am not sure why milk boils over like crazy given the opportunity, but you do not want to clean that mess up!).  Immediately whisk in cornmeal and lower heat to medium low and continue to whisk until all the water is absorbed and the mixture is thick and bubbly (about 1 minute).  Stir in cheese to melt.  Working quickly, as the polenta will firm up quickly, pour half of polenta mixture into a greased baking dish (8x8 or round casserole).  Pour filling over top of bottom layer (or spread over any desired filling), sprinkle with 1/2 cup of shredded cheese, and spread remaining polenta over top of filling topping with the remaining cheese.  Bake in a 400 degree oven for 10-15 minutes or until cheese on top is melted and browning and filling is bubbly. 

To serve, top individual servings with desired garnishes.

Monday, January 10, 2011

Chocolate Chip Cookie Dough Truffles


For me, the joy of making cookies does not lie in the finished product, but in the dough.  And, since I know with every swipe of raw cookie dough comes with the threat to strike me down with salmonella (even packaged cookie doughs have the warnings on the side to ruin the fun these days...), eating the raw dough also comes with a sizable portion of guilt.  No longer.  These truffles are the perfect substitute.  It fulfills all chocolate chip cookie dough cravings without any worry of getting sick (well, you could eat too many of them, but then you would be sick for another reason...). 


Chocolate Chip Cookie Dough Truffles
1 stick (8 Tablespoons) butter, softened
3/4 cup brown sugar, packed
1 teaspoon vanilla extract
2 1/4 cups all-purpose flour
1 (14 oz.) can sweetened condensed milk
a pinch of salt
1/2 cup miniature chocolate chips
1 bag semi-sweet chocolate chips
1 tablespoon coconut oil or shortening
miniature chocolate chips for garnish

In a large mixing bowl, combine butter and brown sugar.  Mix until light and fluffy.  Add vanilla and mix until combined.  Stir in flour, sweetened condensed milk and salt.  Mix well to form dough.  Stir in chocolate chips.  Allow dough to chill in refrigerator until stiff enough to form balls (feel free to sample all of the way through...).  Once dough is chilled, form into 1" balls and place on a cookie sheet.  Transfer to a freezer and allow to chill for 1 1/2-2 hours.  Dough gets soft really quickly, so they're easiest to coat with the chocolate when they're frozen and not just chilled. 

When ready to dip truffles, place bag of chocolate chips and coconut oil or shortening in a microwave-safe bowl and microwave in 30 second increments, stirring frequently, until chocolate is melted and smooth.  Dip each truffle in chocolate mixture and allow to cool on a cookie sheet lined with waxed paper.  Sprinkle with mini chocolate chips to garnish immediately after dipping so they stick!  Store in the refrigerator.
Makes a lot!

Adapted from Annie's Eats

Tuesday, January 4, 2011

Roasted Shrimp Cocktail


Now, this is more of a New Year's dish!  Low in fat, low in calories, high in protein and still quick, easy and elegant!  This is adapted from Ina Garten (The Barefoot Contessa)'s recipe.  This has become our "go to" for something light after a day of overeating (i.e. the day after Thanksgiving and New Year's Day night after we had totally overdone it on football snack food--watching all the Bowl games on New Year's Day is a very big deal with my husband's family).  It took me awhile to develop an appreciation for shrimp cocktail, but now I absolutely love it!  Although those assembled trays you can buy from the grocery store are pretty good, I think if I'm going to spend the money on shrimp, I want it to be great and a few extra minutes roasting them yourself achieves that!

They are great right out of the oven but also excellent leftover and cold right from the fridge.  How versatile! 

Roasted Shrimp Cocktail 
2 pounds peeled, de-veined raw shrimp, tails still on (we use 31-40 count size, defrosted from frozen are fine )*
1 Tablespoon olive oil
1/2 teaspoon kosher or sea salt
1/2 teaspoon freshly ground black pepper
your favorite prepared cocktail sauce
fresh lemon wedges

Preheat oven to 400 degrees F.  Spread out shrimp in a single layer on a baking sheet.  Drizzle with olive oil and toss to coat.  Sprinkle evenly with salt.  Roast at 400 degrees for 6-8 minutes, or just until pink and firm and cooked through (The beautiful thing about shrimp is that they're pretty easy to tell when they're done.  They change color!).  Allow to cool and serve with cocktail sauce and fresh lemon juice, as desired.

*Note: In the United States at least, shrimp are sold by "count."  This meaning the number of shrimp that make up a pound.  The higher the count, the smaller the size of shrimp (and less expensive).  31-40 count shrimp are considered "large size."  You can feel free to substitute a different size of shrimp according to your preference and access, just adjust the cooking time accordingly.

Monday, January 3, 2011

Challa, or Jewish Braided Egg Bread


I would never claim to be a baker.  I am far too impatient and too imprecise for calculated measurements.  Hopefully, when I say that it should give anyone who may feel a little intimidated by baking to know that I have been turning out loaves of challa bread like it's going out of style.  For those of you unfamiliar, challa is a traditionally Jewish egg bread that is typically in a braided style.  This recipe (adapted from one I had found on AllRecipes.com) appears to be foolproof.  It takes a bit of time (mostly unattended), but is unbelievably simple and you will feel so accomplished when you turn out your very own loaves.  Since this recipe makes two huge loaves, you can share one as a gift with someone (include a bottle of syrup--day old challa makes unbelievable French toast--and you will have a friend for life!).  Push off the New Year's diet for a couple more days and ring in 2011 with delicious, white carbs.  You only live once, right?


Challa Bread
makes 2 large loaves

Ingredients:
2 1/2 cups warm water
1 tablespoon active dry yeast
1/2 cup honey or 2/3 cup granulated sugar
4 eggs
1/4 cup vegetable oil
1 tablespoon salt
8-10 cups white unbleached flour (can substitute up to a couple cups of whole wheat flour)

Directions:
In a large bowl, combine water, yeast and honey (or sugar).  Allow to sit for a few minutes (3-5) or until yeast starts to bubble and looks creamy.  Beat in 3 of the 4 eggs, and vegetable oil.  Once thoroughly combined, stir in salt and flour, one cup at a time, until dough is thick enough to turn out onto a floured surface.  Knead, continuing to add flour as needed, until dough is smooth and elastic and no longer sticky (about five minutes).   Return to bowl, cover with a clean, damp cloth and allow to rise in a warm place until doubled in size (about 1 1/2 hours).

After dough has risen, punch down and turn out onto floured surface again.  Divide dough into two equal sized chunks and knead individually (adding more flour as needed to keep dough from being sticky, about five minutes each).  Divide each half into thirds and roll each third into a long, evenly thick, rope (about 1-1 1/2 inches thick and about 15-18 inches long).  Pinch the ends of each of the three ropes together and braid together.  Pinch the other ends together.  At this point, you can leave as a long braid or curl the braid around in a circle to form a wreath, either shape is nice.  Transfer braided dough to a greased baking sheet.  Cover with a damp cloth and allow to rise for an additional hour   Repeat with other half of dough.

Preheat the oven to 375 degrees.  After braids have risen about an hour, beat the remaining egg and brush over the surface of the braids.  Bake at 375 degrees for 20-25 minutes (a lot of recipes I've seen call for much longer baking times, but I have found every time I've made this recipe the loaves are done after about 20 minutes of baking time, so keep a close eye on them after that).  The loaves should be a rich golden brown color and make a nice hollow sound when thumped on the bottom.

Ideally, you should let your bread cool completely before slicing, but we can never wait and tear off pieces (and burning our fingers in the process) to eat it almost immediately.  Leftover bread makes the best French toast you've ever had...

Saturday, January 1, 2011

Happy New Year!

Farewell, 2010!  Hello, 2011!

Lame.  Lame.  Lame.  As I think about how much I've slacked off in blogging the last few weeks it makes me feel, well, lame.  I "resolve" to change that soon.  Recipes to come, just not tonight.

Hoping you all have had a very blessed Christmas season filled with opportunities to observe the wonder that is God made flesh for us.  Wow.  It really is a mind-blowing when you ponder that every circumstance surrounding the birth of Jesus was intentional.  In the midst of the craziness of travel and presents and family get-togethers and baking etc., I've been trying to reflect on the amazing thing that Christmas truly is.  Thank you, Christ, for coming and bringing us the opportunity for true and eternal life through you. 

And, in the spirit of new beginnings and rebirth, I am looking forward to being more intentional and mindful in all areas of my life.  What are your resolutions?

Wishing you a very Happy New Year!  See you soon...