So I contemplated going on a fast from sugar for awhile. That lasted about one day until I decided to make this. I'm telling you, I think my relationship with sugar is borderline stronghold status. Someday soon I probably ought to go cold turkey for awhile, but not today.
I'm not really sure why it is called Monkey Bread, it contains absolutely no monkey and no monkeys were harmed in the making of it. Perhaps, it is because it is so easy maybe even a monkey could make it.
There are certainly a lot of versions of Monkey Bread out there and I think between the various sleepovers I went to as a kid, I've probably tasted a lot of them. This is my favorite. It's made with frozen bread dough and instead of using gobs of butter, you make a cinnamon caramel sauce on the stove with just a touch of butter, milk and (I admit, quite a lot of) sugar.
The Monkey Bread pictured is actually a half batch. I made a full batch of the sauce, though, which meant I had leftovers to experiment with. My initial research findings: it makes an excellent dip for sliced pears and when stirred into coffee with cream, it makes a darn close imitation of a Starbucks' Cinnamon Dolce Latte (the coffee that tastes like a cinnamon roll--how could you go wrong?).
Monkey Bread
1 1/4 cup granulated white sugar, divided
1/4 cup packed brown sugar
1/4 cup milk
2 tablespoons butter
1 3/4 teaspoons ground cinnamon, divided
2 (1-pound) loaves frozen white bread dough, thawed (or 24 unbaked balls of dough for dinner rolls, cut into fourths)
cooking spray
Combine 1 cup granulated sugar, brown sugar, milk, butter and 1 1/4 teaspoons cinnamon in a small saucepan. Bring to a boil, cook 1 minutes. Remove sauce from heat; cool 10 minutes.
Combine 1/4 cup granulated sugar and 1/2 teaspoon cinnamon in a shallow dish, stir well. Cut each loaf of dough into 24 equal portions. Roll each portion in sugar mixture; layer dough balls in a 12 cup Bundt pan coated with cooking spray. Pour sauce over dough; cover and let rise in a warm place, free from drafts 35 minutes or until dough has doubled in size.
Preheat oven to 350 degrees.
Uncover dough, bake at 350 degrees for 25 minutes or until lightly browned. Immediately loosen edges of bread with knife. Place a plate upside down on top of pan and invert bread onto a plate. Drizzle any remaining syrup over bread. Serve while still warm.
Recipe Source: The Best of Cooking Light
P.S. I'm linking this recipe to The Frugal Girls Chic & Crafty Party!
Showing posts with label breakfast. Show all posts
Thursday, September 22, 2011
Thursday, September 8, 2011
Waffles with Two-Berry Syrup
Making waffles presents quite a problem. Unless you have multiple waffle makers or like soggy waffles, you have to eat in shifts.
Being a waffle-loving girl, my third-grade self tried to tackle the problem of soggy waffles. In school, we had an Invention Unit where we were required to create something. Mine was a waffle rack to keep them upright and to prevent sogginess. I was a little ashamed of my decidedly unflashy invention. Compared the shampoo-dispensing shower head by Jimmy Woolmann or Cecily Schraeder's Robot Butler, my idea seemed pretty weak.
Until...I actually saw my exact idea available for purchase in a fancy cooking gadget catalog. Seriously, missed, opportunity. I bet that inventor made a (very, very small) fortune.
Never fear, I've provided a way for everyone to eat crispy waffles all at once. Lay them on a cooling rack placed on top of a cookie sheet in a warm oven. Pretty pedestrian, I know, but in our house it was pretty revolutionary...
This recipe is adapted from my beloved The Best of Cooking Light Cookbook (haven't made a bad recipe from it yet!) and this one does not disappoint. Served Crispy(!) with the berry syrup, they'll make a breakfast crowd very happy indeed.
Waffles:
2 tablespoons ground flaxseeds
1 cup all-purpose flour
1/2 cup whole wheat flour
1/4 cup wheat germ
2 tablespoons sugar
1 1/2 teaspoons baking powder
1/2 teaspoon salt
1 1/2 cups fat-free milk
3 eggs, lightly beaten
2 tablespoons melted butter
1 teaspoon vanilla extract
Syrup:
1 12-oz package frozen mixed berries
1/2 cup maple syrup
Directions: In a medium bowl, combine ground flaxseed meal, flours, wheat germ, sugar, baking powder and salt. Make a well in the center of the mixture. Combine milk, eggs, melted butter and vanilla. Add to the flour mixture, stirring just until moist.
Preheat oven to warm (170-200 degrees F). Place a cooling rack on top of a cookie sheet and place in the oven to keep cooked waffles crisp while cooking the rest of the batch.
Coat a waffle iron with cooking spray, preheat. Spoon about 1/4 cup batter per 4 inch waffle onto the hot waffle iron, spreading batter to edges. Cook 5-6 minutes, or until steaming stops; repeat process with remaining batter. If you're not eating the waffles right as they come off the iron, store cooked waffles in warm oven on prepared rack.
To prepare syrup, combine frozen berries and syrup in a medium saucepan. Cook over medium heat until thoroughly heated. Serve over warm waffles. Serves about 6.
You can also freeze waffles individually and then reheat in the toaster.
Recipe Adapted from The Best of Cooking Light
Being a waffle-loving girl, my third-grade self tried to tackle the problem of soggy waffles. In school, we had an Invention Unit where we were required to create something. Mine was a waffle rack to keep them upright and to prevent sogginess. I was a little ashamed of my decidedly unflashy invention. Compared the shampoo-dispensing shower head by Jimmy Woolmann or Cecily Schraeder's Robot Butler, my idea seemed pretty weak.
Until...I actually saw my exact idea available for purchase in a fancy cooking gadget catalog. Seriously, missed, opportunity. I bet that inventor made a (very, very small) fortune.
Never fear, I've provided a way for everyone to eat crispy waffles all at once. Lay them on a cooling rack placed on top of a cookie sheet in a warm oven. Pretty pedestrian, I know, but in our house it was pretty revolutionary...
This recipe is adapted from my beloved The Best of Cooking Light Cookbook (haven't made a bad recipe from it yet!) and this one does not disappoint. Served Crispy(!) with the berry syrup, they'll make a breakfast crowd very happy indeed.
Waffles:
2 tablespoons ground flaxseeds
1 cup all-purpose flour
1/2 cup whole wheat flour
1/4 cup wheat germ
2 tablespoons sugar
1 1/2 teaspoons baking powder
1/2 teaspoon salt
1 1/2 cups fat-free milk
3 eggs, lightly beaten
2 tablespoons melted butter
1 teaspoon vanilla extract
Syrup:
1 12-oz package frozen mixed berries
1/2 cup maple syrup
Directions: In a medium bowl, combine ground flaxseed meal, flours, wheat germ, sugar, baking powder and salt. Make a well in the center of the mixture. Combine milk, eggs, melted butter and vanilla. Add to the flour mixture, stirring just until moist.
Preheat oven to warm (170-200 degrees F). Place a cooling rack on top of a cookie sheet and place in the oven to keep cooked waffles crisp while cooking the rest of the batch.
Coat a waffle iron with cooking spray, preheat. Spoon about 1/4 cup batter per 4 inch waffle onto the hot waffle iron, spreading batter to edges. Cook 5-6 minutes, or until steaming stops; repeat process with remaining batter. If you're not eating the waffles right as they come off the iron, store cooked waffles in warm oven on prepared rack.
To prepare syrup, combine frozen berries and syrup in a medium saucepan. Cook over medium heat until thoroughly heated. Serve over warm waffles. Serves about 6.
You can also freeze waffles individually and then reheat in the toaster.
Recipe Adapted from The Best of Cooking Light
Tuesday, August 30, 2011
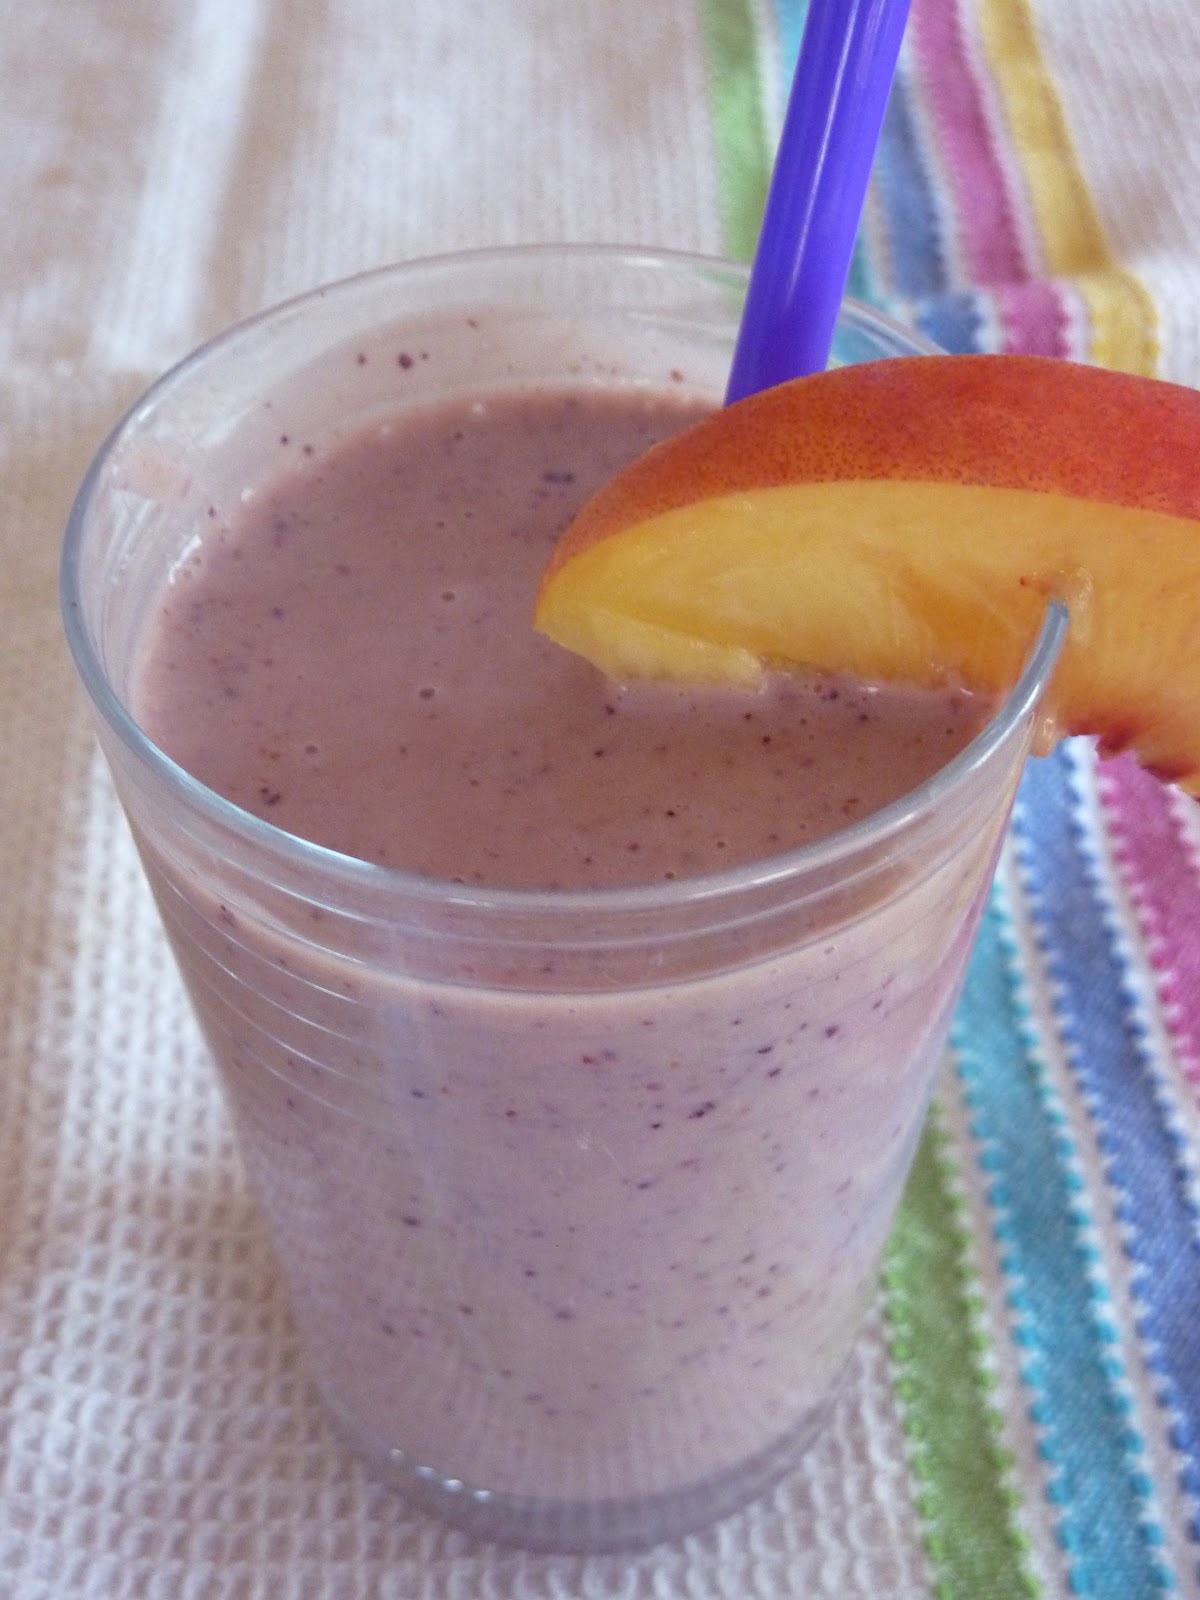
Peach Banana-Berry Smoothies
Silas, my five year old, has just discovered his first loose tooth. Loose teeth really give me the shivers. They are just plain creepy. He is constantly wanting to show me its wiggly progress which makes me cringe. His loose tooth has given him a bit of trouble when eating. As the nice mother I am, I made these smoothies to give him an easy to eat breakfast (although maybe to expedite the loose tooth falling out process, perhaps I should be serving him whole apples to bite into...).
This recipe is obviously just a starting point. Smoothies are a great opportunity to use just about any combination of fruits (and vegetables!) you have available. Feel free to mix, match and customize! I've gotten used to throwing in a handful of fresh spinach leaves and a spoonful of ground flax seeds to sneak in even more nutrition. Those little extras are completely optional, but I can assure you that they blend right up and don't affect the flavor a bit.
Also, as I've been highlighting quick, weekday breakfasts, a smoothie recipe definitely needs to be included!
Peach Banana-Berry Smoothies
makes about 3 cups
1 banana, peeled, frozen and broken into chunks
1 cup frozen blueberries
2 whole peaches or nectarines, pit removed and cut into chunks
1 cup plain yogurt
1 tablespoon ground flax seeds (optional)
1 handful fresh spinach leaves, washed and dried (optional)
milk or fruit juice as needed
In the pitcher of a blender, place in order: yogurt, peaches, blueberries, banana chunks, spinach and flax seeds (basically, you want the more juicy kinds of fruit and any liquid on the bottom. Blend on high speed, stopping and scraping down any stubborn pieces of fruit as needed, until smooth. If mixture is especially thick, you can add a splash of milk or juice. If it is too thin, a few ice cubes can help. Pour into glasses and enjoy, drinking through straws preferable.
Note: I like to put any fruit that is starting to get close to past its prime into smoothies. If I'm not going to use it right away, it's great to freeze it in chunks and have it ready to throw into the blender at a moment's notice. Once bananas are overripe, I will peel them, place them in baggies and throw them in the freezer.
Also, lots of surprising fruits are great in smoothies---try whole grapes, chunks of cantaloupe or honeydew, kiwi, peeled oranges, pineapple, kiwis, mango...I know a friend who always throws a few baby carrots into hers and another friend who puts raw beets into her smoothies (I hear they make it a lovely pink color, but I've yet to try).
This recipe is obviously just a starting point. Smoothies are a great opportunity to use just about any combination of fruits (and vegetables!) you have available. Feel free to mix, match and customize! I've gotten used to throwing in a handful of fresh spinach leaves and a spoonful of ground flax seeds to sneak in even more nutrition. Those little extras are completely optional, but I can assure you that they blend right up and don't affect the flavor a bit.
Also, as I've been highlighting quick, weekday breakfasts, a smoothie recipe definitely needs to be included!
Peach Banana-Berry Smoothies
makes about 3 cups
1 banana, peeled, frozen and broken into chunks
1 cup frozen blueberries
2 whole peaches or nectarines, pit removed and cut into chunks
1 cup plain yogurt
1 tablespoon ground flax seeds (optional)
1 handful fresh spinach leaves, washed and dried (optional)
milk or fruit juice as needed
In the pitcher of a blender, place in order: yogurt, peaches, blueberries, banana chunks, spinach and flax seeds (basically, you want the more juicy kinds of fruit and any liquid on the bottom. Blend on high speed, stopping and scraping down any stubborn pieces of fruit as needed, until smooth. If mixture is especially thick, you can add a splash of milk or juice. If it is too thin, a few ice cubes can help. Pour into glasses and enjoy, drinking through straws preferable.
Note: I like to put any fruit that is starting to get close to past its prime into smoothies. If I'm not going to use it right away, it's great to freeze it in chunks and have it ready to throw into the blender at a moment's notice. Once bananas are overripe, I will peel them, place them in baggies and throw them in the freezer.
Also, lots of surprising fruits are great in smoothies---try whole grapes, chunks of cantaloupe or honeydew, kiwi, peeled oranges, pineapple, kiwis, mango...I know a friend who always throws a few baby carrots into hers and another friend who puts raw beets into her smoothies (I hear they make it a lovely pink color, but I've yet to try).
Sunday, August 28, 2011
Back to School Breakfast Ideas
We're in that time of year, school is starting and the morning routine becomes a bit more hectic. When I was a kid, weekday breakfasts consisted of a bowl of Cocopuffs or Bisquick pancakes. Not that those childhood breakfasts have left me feeling deprived or anything, but these days I like to start our mornings with something a bit more special. In this case, special doesn't mean hard work though.
I'm working on a more accessible recipe index, but in the meantime, I thought I'd suggest some quick and easy breakfast ideas. After all, it is the most important meal of the day!
Muffins and Breads
- Make up batches of muffins or bread and once cooled wrap and freeze individual muffins or slices of bread so they're ready to "grab and go."
- Freeze your leftover weekend pancakes and reheat in the toaster for a quick weekday bite
- Best Blueberry Muffins
- Mini Pineapple Muffins with Coconut Crumble
- Lemon Butter Muffins
- Banana Bran Muffins
- Maple Almond Butter Cookies
- Date Nut Bread
- Cinnamon Banana Bread
- Perfect Pancakes
- For a money-saving option, buy the 32 ounce containers of yogurt and portion it in individual containers. Packed with a side of granola in a baggie and a spoon, you're ready to leave in no time flat!
- For quick steel cut oats, see the note at the bottom of "Funky Monkey Oatmeal."
Eggs
Keep a stash of hard boiled eggs in your fridge for a quick high protein bite or make up batches of breakfast burritos or egg sandwiches, wrap individually and keep in the freezer ready to microwave on a moment's notice.
- No-Fail Hard Boiled Eggs
- Breakfast Burritos
- Frizzled Eggs
- Homemade "Egg McMuffins": fry (or "frizzle" see link above an egg and layer on a toasted English muffin with a slice of cheese
Sunday, August 21, 2011
Peanut Butter Granola
| Peanut Butter Granola with Chocolate Chips and Raisins |
Something fantastic about homemade granola is ingredients can be mixed and matched based on what's in your cupboard. Feel free to add or delete things from these recipes based on your mood and what's in stock.
I wanted to try a peanut butter rendition this last time. I really like how the peanut butter makes for bigger, "snackable" clusters. It's been hard to resist picking them out of the jar and munching them one by one. Not being a huge peanut fan, I don't know if this is my favorite batch, but definitely share-worthy. And, as just about every time he's getting another scoop, my husband likes to remind me of what one of our latest house guests commented: "This granola is LEGIT!"
Also, check out the previous post on Mango Ginger Granola and below for a more traditional granola variation for other granola related ideas. I am looking forward to experimenting in making my own granola bars next!
Peanut Butter Granola
3 cups rolled oats (the "Old Fashioned" kind)
1/2 cup wheat germ
1/4 cup sesame seeds
1/2 cup shredded coconut
1/2 cup honey or maple syrup or agave nectar
1 teaspoon vanilla
1/2 cup peanut butter
1/2 cup roasted peanuts, roughly chopped
1/2 cup chocolate chips (optional)
1/2 cup raisins (optional)
Preheat oven to 325 degrees. Line a rimmed baking sheet with a piece of parchment. In a large bowl, combine oats, wheat germ, sesame seeds and coconut. Stir together honey, vanilla and peanut butter in a microwavable dish (a pyrex measuring cup is ideal). Heat for about 30 seconds to soften peanut butter. Stir together peanut butter mixture until smooth. Pour over oats and mix together until all the oats are moistened. Turn mixture out onto prepared baking sheet. Spread into a single layer (mixture will be a bit clumpy and that's ok, it gives you lots of little clusters to snack on!). Bake at 325 for 25-30 minutes, stirring every 5-10 minutes to prevent burning. Granola is done when golden brown. Remove from oven and allow to cool completely. Stir in peanuts and chocolate chips and raisins (if using). Transfer to an airtight container.
| Traditional Granola Recipe with Raisins |
Traditional Granola Variation:
Combine oats, wheat germ, sesame seeds and coconut as above. Add 1/2 cup raw almonds (slivered, sliced or roughly chopped).
Omit peanut butter and substitute 1/4 cup vegetable oil. Stir oil into honey (or maple syrup or agave nectar) along with 1 teaspoon ground cinnamon and 1 teaspoon vanilla extract.
Bake at 325 for 25-35 minutes, stirring every 5-10 minutes to prevent browning.
Remove from oven and allow to cool slightly.
Stir in 1/2 cup toasted sunflower seeds and 1 cup dried fruit (or combination) of your choice (raisins, chopped dates, apricots, dried cherries, cranberries, blueberries, mango...).
Store in an airtight container.
Tuesday, August 16, 2011
Banana Bran Muffins
I seem to always have at least a couple brown bananas hanging out in my fridge. Perhaps you can relate. Sometimes I take initiative and peel them, put them in baggies and freeze them so they're ready for smoothies. Other times, they demand to be baked into something delicious. This time, they're baked into something delicious and healthy!
I like the individual portion size of a banana muffin (over bread where I'm prone to keep hacking away at the loaf until there's not much left). These muffins are also more portable, which make for great grab-and-go breakfasts (especially split open and spread with peanut butter!). And (as a wise sage from my mom's group taught me to do with banana bread), after baking, I brush the tops with melted butter and sprinkle with cinnamon and sugar to up the "treat-factor." Sweet.
Banana Bran Muffins
- 2 large eggs
- 2/3 cup packed light brown sugar
- 1 cup mashed ripe bananas, (2 medium)
- 3/4 cup plain yogurt
- 1/4 cup milk
- 1 cup unprocessed wheat bran, (found in baking or health section, can substitute oat bran)
- 1/4 cup canola oil
- 1 teaspoon vanilla extract
- 1 cup whole-wheat flour
- 3/4 cup all-purpose flour
- 1 1/2 teaspoons baking powder
- 1/2 teaspoon baking soda
- 1/2 teaspoon ground cinnamon
- 1/4 teaspoon salt
- 2 tablespoons melted butter
- 2 tablespoons granulated sugar
- 1 teaspoon ground cinnamon
Preparation
- Preheat oven to 400°F. Coat 12 muffin cups with cooking spray or distribute paper liners.
- Whisk eggs and brown sugar in a medium bowl until smooth. Whisk in bananas, yogurt, milk, wheat bran, oil and vanilla.
- Whisk whole-wheat flour, all-purpose flour, baking powder, baking soda, cinnamon and salt in a large bowl. Make a well in the dry ingredients; add the wet ingredients and stir with a rubber spatula until just combined. Scoop the batter into the prepared muffin cups (they’ll be quite full).
- Bake the muffins until the tops are golden brown and spring back when touched lightly, 15 to 25 minutes. Let cool in the pan for 5 minutes. Loosen edges and turn muffins out onto a wire rack to cool slightly before serving.
- Mix together granulated sugar and cinnamon in a small bowl. Brush baked muffin tops with melted butter and top with cinnamon sugar, if desired.
Tuesday, August 9, 2011
Sausage Potato Brunch Casserole
Here's another recipe that I would imagine serving if I ran a bed and breakfast. We have frequent overnight guests, so sometimes it does feel like a bed and breakfast around here! This is a great one to serve to guests because you can whip it up the night before. That means in the morning you get to spend more time in conversation around cups of coffee and not whipping yourself into a short-order-cook-syle-breakfast-making-frenzy. It covers all the bases in one dish: eggs, meat, cheese, vegetables, potatoes...it'll really leaving you feeling satisfied. Feel free to substitute diced ham for a more "Denver-omelet" style breakfast casserole.
Sausage Potato Brunch Casserole
4 cups (about 16 oz) frozen diced potatoes ("Country Style Hash browns"), thawed
salt and pepper
1 teaspoon garlic powder
1 pound bulk ground breakfast sausage (or links, casings removed)
1 small onion, finely diced
1/2 green pepper, finely diced
1/4 red bell pepper, finely diced
1/2 cup white button mushrooms, thinly sliced
10 eggs
3/4 cup milk
2 teaspoons hot pepper sauce (i.e. Tobasco), optional
1 cup shredded cheddar cheese
salsa or ketchup for serving, optional
Grease a 9x13 baking dish with cooking spray. Spread potatoes in an even layer across dish. Sprinkle surface evenly with garlic powder and season with salt and pepper. Set aside.
In a large skillet over medium high heat, brown sausage until cooked through. Crumble and sprinkle evenly over potato layer. In the same skillet, saute onion until softened, about 5 minutes. Remove from skillet and set aside.
Return skillet to heat and saute peppers and mushrooms until softened, about 5 minutes. Add pepper-mushroom mixture to onions, stir together and spread evenly over sausage and potatoes. Layer 1/2 cup shredded cheese over top.
In a large bowl, whisk together eggs until well combined. Stir in milk, hot pepper sauce and additional salt and pepper. Pour egg mixture over top of casserole. Top with remaining shredded cheese. At this point, casserole can be covered and refrigerated overnight.
When time to bake, remove from fridge for about 15 minutes. Bake at 350 degrees for about 1 hour or until eggs are set, cheese is melted and a knife inserted in the middle comes out clean. Remove from oven and allow to sit for 10-15 minutes before slicing and serving.
Adapted from: Easy Breakfast Casserole Recipe with Sausage and Potatoes
Sunday, July 31, 2011
Best Blueberry Muffins
I have a bit of a love-hate relationship with blueberry muffins. Even though they sound so appealing, just about every blueberry muffin I've come across in stores or coffee shops remind me more of how my Strawberry Shortcake doll's best friend smelled than a delicious baked good. Add to that, muffins are notoriously high in fat and calories makes me usually pass.
Until now.
| Come to Mama |
Beware you might consume your day's worth of calories in muffins. These are best shared with a friend over a cup of coffee (make her take the leftovers).
Blueberry Muffins
Topping:
1/3 cup granulated sugar
1 1/2 teaspoons grated lemon zest
Muffins:
2 cups (about 10 ounces) fresh blueberries, picked over (*see note if using frozen)
1 cup plus 1 teaspoon sugar
2 1/2 cups unbleached all-purpose flour
2 1/2 teaspoons baking powder
1 teaspoon salt
2 eggs
4 tablespoons (1/2 stick) butter, melted and cooled slightly
1/4 cup vegetable oil
1 cup buttermilk (**see note)
1 1/2 teaspoons vanilla extract
For the topping, stir together the 1/3 cup sugar and lemon zest in a small bowl. Set aside.
Adjust the oven rack to the upper middle position and preheat the oven to 425 degrees. Line a muffin tin with paper liners.
In a small sauce pan, bring 1 cup of the blueberries and 1 teaspoon of sugar to a simmer over medium heat. Cook, mashing the blueberries with a spoon and stirring frequently, until the berries have broken down and the mixture is thickened and reduced to 1/4 cup, about 6 minutes. Allow to cool to room temperature, 10-15 minutes.
Mix together the flour, baking powder and salt. In a medium bowl, whisk together the remaining cup of sugar and eggs together in a medium bowl until thick and well mixed. Slowly whisk in the butter and oil until combined. Whisk in buttermilk and vanilla. Fold the egg mixture into the flour mixture just until moistened (the batter will be very lumpy with a few spots of dry flour; do not overmix). Gently fold in blueberries just until dispersed.
Fill muffin cups completely full with batter. Spoon 1 teaspoon of the cooked berry mixture into the center of each cup of batter. Using a chopstick or skewer, gently swirl the berry filling into the batter using a figure-eight motion (see picture below and also admire my antique muffin tins courtesy of my late Grandma Kaye).
| We're swirling, we're swirling... |
Bake until the muffin tops are golden and just firm, 17-19 minutes. Cool the muffins in the tin for 5 minutes, then remove them and transfer to a wire rack and let cool 5 minutes before serving.
*Note: If using frozen berries, cook 1 cup of berries as directed above. Rinse the remaining 1 cup berries under cold water and dry well. Stir blueberries in as directed above as well.
**Note: You can make your own buttermilk substitute. Add 1 tablespoon lemon juice to 1 cup milk and let sit for 2 minutes or combine 3/4 cup plain yogurt with 1/4 cup milk.
Source: The Best of America's Test Kitchen 2010
Wednesday, July 20, 2011
Pinepple Upside Down French Toast Bake
This is a breakfast dish that is probably not going to win too many health awards. I think it ranks pretty highly in the delicious category, though. French toast is really elevated to the next level when baked with a layer of caramelized pineapple. Sometimes I dream of running a bed and breakfast someday, and if I did, this dish would likely make a frequent appearance. Here, it is pictured (don't mind that the last piece available to photograph after we'd had brunch with our church happened to get a wee bit dark--ahem, that's just "extra caramelization" : ) alongside Honey-Lime Drizzled Canteloupe and Blueberries (scroll down for my extremely precise recipe! : ).
Pineapple Upside Down French Toast Bake
1 stick (8 tablespoons or 1/2 cup) butter
1/2 cup brown sugar, packed
1 20 ounce can crushed pineapple in juice, drained and juice reserved
6 large eggs
1 cup half and half or milk
1/4 cup reserved pineapple juice
pinch of salt
1/2 teaspoon vanilla extract
1/2 teaspoon ground cinnamon
8-10 1" slices of bread (French, Sourdough, Italian), day-old is great
Grease a 9x13 inch baking dish with cooking spray.
In a small sauce pan, melt butter over medium heat. Stir in brown sugar and stir until dissolved. Add pineapple and mix well. Remove from heat. Spread in an even layer over bottom of baking dish. Arrange slices of bread in a single layer over top of pineapple mixture.
In a bowl, mix together eggs, half and half, reserved pineapple juice, salt, vanilla and cinnamon. Pour over bread.
Bake French Toast in a 350 degree oven for 25-30 minutes, or until bread is golden, eggs are set and knife inserted in the middle comes out clean. Allow to sit 10-15 minutes before serving. Cut into squares, and lift out of pan with a pancake turner (you can flip it over so the pineapple part is actually upside down, if you like).
French Toast can be made a day ahead of time, covered with foil and refrigerated overnight.
Remove from fridge 15 minutes before baking.
Source: Pineapple-Upside Down French Toast presented by The Bouldin House Bed and Breakfast
Honey-Lime drizzled Cantaloupe and Blueberries
Slices of cantaloupe, rind removed
blueberries
1 lime, zested and juiced
1 tablespoon honey
1 tablespoon thinly sliced fresh basil or mint leaves
Arrange melon and berries on a platter. Sprinkle lime zest over fruit. Whisk together lime juice and honey. Drizzle over fruit. Garnish with thinly sliced mint or basil leaves. Serve immediately.
Tuesday, June 21, 2011
Thoughts on The Next Food Network Star...Episode 1
Note: These are purely my ramblings, proceed at your own risk! : )
I had a very sweet friend say that while she was watching The Next Food Network Star she was thinking of me and wondering what I would've made for the challenges. I have always watched that show and thought "I could do that!" (to the tune that I--to my embarrassment--have actually auditioned a couple times. I actually got a bit of positive feedback in a previous season's audition rounds but that's as far as it ever went). On the other hand, I have also watched the show and thought, "There's no way on Earth I could do that! I am so not cut out!"
One of the things that always goes through my head when I watch the show is that the food I cook is not flashy enough for the show. It always seems like the contestants make really complicated sounding sauces and use exotic ingredients. While I think this is interesting and I enjoy the challenge of using lesser known items and techniques, my cooking style definitely is aimed at accessibility. I want to make things that aren't intimidating and use ingredients that every day people have actually heard of and can find in their own local grocery store. Still, since I feel like I have a strength in coming up with dishes made from what's on hand, I have always thought the challenges looked really fun.
Since we got rid of our cable this past Fall, I thought I wouldn't get to see the show I enjoyed so much, but thanks to Hulu, I am getting to see the episodes. They don't post right away, and since I've had a really busy week I'm pretty behind in viewing, but I suppose as more episodes go on, there might be marathons played and maybe these thoughts (although probably not interesting) might be more relevant.
First Episode Challenge:
Brunch or Breakfast Dish that is "You on a Plate":
I would probably make something along the lines of a breakfast sandwich with a "frizzled egg (see my poached fried egg post)," slices of ripe tomato, freshly ground black pepper and tangy goat cheese broiled on an whole wheat English muffin (maybe finished with some ripe, creamy avocado slices?). Why is this me? Born out of ingredients on hand, it comes together in a snap. It's on the healthy side with the whole wheat muffin and a simple, slight twist on an original, familiar food (the poached-fried method on the egg rather than just a fried or plain poached).
It doesn't seem very fancy compared to what the other contestants put out there...oh well, it's "me" and accessible to other home cooks.
Also, to anyone else who's watching the show...oh my goodness, how awful does Penny come across in the editing? Who's your favorite contestant on the show?
p.s. For real recipes this week, I'm hoping to make a BLT Panzanella Salad, a Coconut Lime Pie and Boston Cream Cupcakes...we'll see how that pans out and if it does, I'll definitely share my results!
I had a very sweet friend say that while she was watching The Next Food Network Star she was thinking of me and wondering what I would've made for the challenges. I have always watched that show and thought "I could do that!" (to the tune that I--to my embarrassment--have actually auditioned a couple times. I actually got a bit of positive feedback in a previous season's audition rounds but that's as far as it ever went). On the other hand, I have also watched the show and thought, "There's no way on Earth I could do that! I am so not cut out!"
One of the things that always goes through my head when I watch the show is that the food I cook is not flashy enough for the show. It always seems like the contestants make really complicated sounding sauces and use exotic ingredients. While I think this is interesting and I enjoy the challenge of using lesser known items and techniques, my cooking style definitely is aimed at accessibility. I want to make things that aren't intimidating and use ingredients that every day people have actually heard of and can find in their own local grocery store. Still, since I feel like I have a strength in coming up with dishes made from what's on hand, I have always thought the challenges looked really fun.
Since we got rid of our cable this past Fall, I thought I wouldn't get to see the show I enjoyed so much, but thanks to Hulu, I am getting to see the episodes. They don't post right away, and since I've had a really busy week I'm pretty behind in viewing, but I suppose as more episodes go on, there might be marathons played and maybe these thoughts (although probably not interesting) might be more relevant.
First Episode Challenge:
Brunch or Breakfast Dish that is "You on a Plate":
I would probably make something along the lines of a breakfast sandwich with a "frizzled egg (see my poached fried egg post)," slices of ripe tomato, freshly ground black pepper and tangy goat cheese broiled on an whole wheat English muffin (maybe finished with some ripe, creamy avocado slices?). Why is this me? Born out of ingredients on hand, it comes together in a snap. It's on the healthy side with the whole wheat muffin and a simple, slight twist on an original, familiar food (the poached-fried method on the egg rather than just a fried or plain poached).
It doesn't seem very fancy compared to what the other contestants put out there...oh well, it's "me" and accessible to other home cooks.
Also, to anyone else who's watching the show...oh my goodness, how awful does Penny come across in the editing? Who's your favorite contestant on the show?
p.s. For real recipes this week, I'm hoping to make a BLT Panzanella Salad, a Coconut Lime Pie and Boston Cream Cupcakes...we'll see how that pans out and if it does, I'll definitely share my results!
Tuesday, May 31, 2011
Mini Pineapple Muffins with Coconut Crumble
And, while I'm on a tropical theme (see the last post on Key Lime Bars)...
Last week, I needed to throw together a baked good (and something that I actually had ingredients in my pantry for) for my Bible study girls quickly! I came across the concept of a pineapple muffin with coconut crumble and I'm so glad I gave these a try! These sweet little muffins are buttery but still light and the pineapple makes them moist. The coconut crumble topping adds a perfect, caramel-y, crunch to the soft muffin underneath. The mini size was perfect for toddlers and mommies alike and there were plenty to go around. If you don't have access to a mini muffin pan, don't despair, you can bake them regular size too, just increase the baking time to 18-20 minutes!
Pineapple Muffins:
3/4 stick (6 tablespoons) butter, softened
1/2 cup granulated sugar
1 large egg
1/2 cup milk
1 cup crushed pineapple in juice, undrained
1 teaspoon vanilla extract
2 cups all purpose flour
1 tablespoon baking powder
1/4 teaspoon salt
Coconut Crumble
1/2 cup brown sugar, packed
2 tablespoons reserved flour mixture
1 tablespoon butter, softened
1/2 cup sweetened shredded coconut
Preheat oven to 400 degrees. Spray mini muffin tin with cooking spray (or fill cups with paper liners). Set aside.
In a small bowl, stir together flour, salt and baking powder. Remove 2 tablespoons of mixture and reserve for crumble. Set aside remaining flour mixture for later.
To prepare crumble, stir together brown sugar, 2 tablespoons flour mixture and butter with a fork until butter is worked in and mixture is crumbly. Stir in coconut and set the mixture aside.
For muffin batter, in a medium mixing bowl, cream together 6 tablespoons softened butter and sugar. Beat until fluffy. Add in egg, milk, pineapple with juice and vanilla. Blend together just until combined. Scrape down sides of bowl with a spatula and fold in the flour mixture, stirring just until combined. The batter will still be lumpy. Spoon or scoop by tablespoons into prepared muffin tins. Sprinkle teaspoons of crumble topping on each muffin and press down gently. Place muffin pan in the oven.
Bake for 12-14 minutes or until muffins are golden brown and spring back when lightly pressed with a finger. Remove from oven and allow to cool for a few minutes. Use a butter knife around the edge of each muffin to remove if necessary. Serve warm or at room temperature.
Recipe Adapted from: "Cupcakes! From the Cake Doctor" by Anne Byrn
Monday, May 9, 2011
Rhubarb Crumble Coffee Cake
Sheesh, I've been lazy when it comes to posting lately. My apologies if anyone noticed. I was finishing up a lovely time in Minnesota with my family (except for the fact that it actually had the gall to snow on the first two days of May...falling into such stereotypes, Minnesota, I'm so disappointed in you...). We are back to normal life but I have one more recipe that I made while back there (and utilizing my mom's vast selection of dishes and coordinating linens, which I will miss...). It involves one of my favorite Springtime ingredients, rhubarb.
Speaking of, I have a tragic story involving rhubarb coffee cake. I've mentioned before how I was involved in 4-H (see my post on Samoas bars--and yes, I realize samoas come from girl scouts, that just was where I remembered I had put in a teaser about this event...). Anyway, 4-H makes a big deal about entering items you worked on for exhibition at fairs. Well, I didn't raise animals and didn't build bird houses, or sew, or make handicrafts or partake in photography. What I did like to do was bake and so the summer I was eight, I planned to enter a Rhubarb Cake in the Hennepin County Fair with the goal of winning a blue ribbon.
One steamy June day, the time for judging arrived. I had painstakingly prepared my cake with rhubarb harvested from my father's garden, hand crumbled the cinnamon streusel and baked the cake to perfection. It was time to go and we were running late, as usual. My mom loaded myself, my brother, my sister and two neighbor kids she watched into our '87 Grand Caravan (almond colored with the awesome faux wood paneling on the side, of course). In the chaos that is loading five children into a vehicle, the cake, unfortunately, remained on the roof of the minivan. We took off down the alley and I don't remember if I suddenly realized my lap was devoid of a potentially prize winning cake or if we heard the sound of it smashing on the cement behind us, but needless to say, there was no blue ribbon in the cards that year.
So sad.
The recipe for that fateful cake has disappeared, but my love for rhubarb never will. Here is a winner of a recipe (ha ha)! Big cinnamon-y crumbs over top of vanilla cake dotted with sweet-tart pieces of rhubarb. I made it with whole wheat flour to reduce the guilt factor. For best results, avoid alleys and old school minivans and possibly enjoy with some vanilla ice cream or a dollop of whipped cream.
Rhubarb Crumble Coffee Cake
Rhubarb Filling:
1/2 pound rhubarb, trimmed and cut into 1/2 inch pieces
1/4 cup granulated sugar
1/2 teaspoon ground ginger
1 teaspoon cornstarch
Cinnamon Crumble:
1/3 cup brown sugar
1/3 cup granulated sugar
1 teaspoon cinnamon
1/2 teaspoon ground ginger
1/2 teaspoon salt
1 stick butter (8 tablespoons or 4 ounces), melted
1 1/2 cups whole wheat pastry flour (can substitute all purpose flour just fine, I was just trying to be healthy)
Cake batter:
1/3 cup sour cream or Greek yogurt
2 large eggs
2 teaspoons vanilla extract
1/3 cup granulated sugar
4 tablespoons butter, melted
1 cup whole wheat pastry flour (again, you can substitute)
1/2 teaspoon baking powder
1/2 teaspoon baking soda
1/4 teaspoon salt
Directions: Preheat oven to 350 degrees.
In a small bowl, mix together sugar, corn starch and ground ginger from the rhubarb filling ingredients list. Toss in rhubarb, stir to coat rhubarb in the sugar mixture and set aside.
To make cinnamon crumble, mix together in another bowl the brown and white sugar, cinnamon, ginger and salt. Stir in melted butter and mix until thoroughly combined and sugar starts to dissolve. Stir in flour with a spatula or wooden spoon. It will feel like a stiff dough. Set aside in one big mass.
In one final bowl (are you running out of dishes yet? I'm sorry, it will be worth it), stir together sour cream, eggs, vanilla extract and sugar until smooth. Combine together flour, baking powder, baking soda and salt and add into wet ingredients, gently stirring just until combined. Fold in rhubarb sugar mixture. Pour into a greased 8x8 baking dish. Using your fingers, break cinnamon crumble mixture into large crumbs and sprinkle evenly across top of cake batter. Bake for 35-45 minutes, or until toothpick comes out clean of wet batter (it might be a bit moist if you stick a piece of rhubarb). Serve warm or at room temperature. Ice cream or whipped cream garnish, optional.
Recipe Adapted from Big Crumb Coffee Cake by Smitten Kitchen
Monday, May 2, 2011
Maple Almond Butter Cookies
This was a recipe I wasn't completely sold on. Sure, I was intrigued by the idea, something like a peanut butter cookie but made with almond butter (not to be confused with a "butter cookie" with almonds...although now that I mention it, that sounds interesting too, I now have visions of little Dutch windmill cookies dancing through my head).
The vegan batter tasted pretty good (no raw eggs to contend with so the dough was fair game!) and I don't think I could make a much healthier cookie if I tried. But when they came out of the oven, I was disappointed. They just weren't as good as I was hoping and I figured that it would just go in the "misses" pile.
That was last night.
This morning, I thought I should give them one last try. Wow. The cookies were soft, nutty and just slightly maple-y sweet. I had to make myself stop after one knowing I'd already eaten breakfast (although these are so healthy, they could actually pass as a "breakfast cookie"). I'm starting to think of new variations I could play around with--adding some chopped dates or orange zest, dried cranberries or some cinnamon, substituting honey (not vegan) or agave for the maple syrup...there's a lot of potential in these power-packed bites!
Maple Almond Butter Cookies
makes 18-20 cookies
1/2 cup creamy natural style almond butter (could also try it with peanut butter)
1/2 cup maple syrup
2 tablespoons vegetable oil (I used the oil on the top of the jar of the almond butter that I couldn't stir back in and that worked well!)
1/2 teaspoon vanilla extract
1/2 teaspoon almond extract (or just just double the amount of one or the other)
1/2 cup whole wheat pastry flour (you could try white flour, it would just be less nutritious or regular whole wheat flour for an even more rustic cookie)
1/2 teaspoon baking soda
1/2 teaspoon salt
1/2 cup chopped almonds (I used some "Almond Accents" brand sliced toasted almonds)
Preheat oven to 350 degrees F. In a medium mixing bowl, stir together almond butter, syrup, oil and extracts. In a separate bowl (or let's be honest, I hate to make extra dirty dishes so I just threw the dry ingredients on top of the wet and mixed them together carefully before stirring the whole mess together--there's a reason why I can be a bit hit and miss in my baking), stir together dry ingredients and then stir into almond butter mixture, stirring just until combined. Roll heaping teaspoons into balls, place about 2 inches apart on a cookie sheet. Flatten slightly. Bake 8-10 minutes or until firm on the edges, but still soft. Remove from oven and cool completely. Taste even better the next day!
Recipe source: Sweet+Natural
Wednesday, April 20, 2011
Grapefruit Drop Scones
A couple weeks ago, I thought myself very lucky to have been gifted a very giant bag of citrus fruit fresh from Arizona. Does it strike anyone else as ironic that there are a ton of grapefruit grown in a state where there is a large, ahem, "mature" population who uses medication prone to dangerous reactions with grapefruit? Apparently, there are RV parks down there where people can not even give grapefruit away. So many grapefruit left uneaten...so sad...
Anyway, now that a couple of weeks have passed, we ran out of steam using the grapefruit and until this morning, a couple were still languishing in my fruit bowl. I am such a hypocrite. Determined to use them and needing to bake up something for my Bible study this morning, I came across a recipe for Grapefruit Scones and was intrigued. They ended up light and tender, and had just a hint of grapefruit flavor hidden in their flakey, biscuit-y goodness. I made drop scones (instead of the recognizable triangular shape) because the dough ended up pretty sticky, and what can I say, I'm lazy like that.
Grapefruit Drop Scones
2 small-ish grapefruit or 1 large beast of a grapefruit
1/4 cup granulated sugar
1 1/2 cups all purpose flour
1 teaspoon baking powder
1/2 teaspoon baking soda
1/4 teaspoon salt
6 tablespoons butter
2 tablespoons honey
1/2 cup plain yogurt
Preheat oven to 425 degrees F.
Remove zest from grapefruit and place in a small bowl. Add sugar and stir together to make really lovely, fragrant grapefruit sugar. Set aside. Cut the remaining peel off of the grapefruit and lop off the top and bottom to show a nice, naked grapefruit. Using a small paring knife, cut out segments by running your knife along the lines of the membrane out of the grapefruit. It's okay if some of them fall apart. Sometimes grapefruit are even so cooperative that you can just peel the membrane off with your fingers. However you do it, just remove the flesh of the grapefruit and set it aside as well.
In a medium mixing bowl, combine flour, baking powder, baking soda, salt and half of grapefruit sugar mixture. Cut in butter with a pastry blender or two knives (or your fingers if you work fast and not too much) until flour mixture is crumbly and there are still tiny chunks of butter (about the size of small peas) in your flour mixture. Fold in honey, yogurt and grapefruit segments just until the mixture is combined and comes together. Drop by large tablespoonfuls a couple inches apart onto a greased cookie sheet (or if you want pretty, shaped scones, you can turn dough onto a floured surface, pat it out into a dish and cut wedges a la a pizza pie, then place evenly spaced apart onto greased cookie sheet). Sprinkle remaining grapefruit sugar evenly on top of scones, pressing lightly if needed. Bake at 425 degrees for 15-17 minutes or until golden brown on top. Allow to cool for about 10 minutes on baking sheet.
Recipe adapted from: Grapefruit, Honey and Yogurt Scones by Joy the Baker
Anyway, now that a couple of weeks have passed, we ran out of steam using the grapefruit and until this morning, a couple were still languishing in my fruit bowl. I am such a hypocrite. Determined to use them and needing to bake up something for my Bible study this morning, I came across a recipe for Grapefruit Scones and was intrigued. They ended up light and tender, and had just a hint of grapefruit flavor hidden in their flakey, biscuit-y goodness. I made drop scones (instead of the recognizable triangular shape) because the dough ended up pretty sticky, and what can I say, I'm lazy like that.
Grapefruit Drop Scones
2 small-ish grapefruit or 1 large beast of a grapefruit
1/4 cup granulated sugar
1 1/2 cups all purpose flour
1 teaspoon baking powder
1/2 teaspoon baking soda
1/4 teaspoon salt
6 tablespoons butter
2 tablespoons honey
1/2 cup plain yogurt
Preheat oven to 425 degrees F.
Remove zest from grapefruit and place in a small bowl. Add sugar and stir together to make really lovely, fragrant grapefruit sugar. Set aside. Cut the remaining peel off of the grapefruit and lop off the top and bottom to show a nice, naked grapefruit. Using a small paring knife, cut out segments by running your knife along the lines of the membrane out of the grapefruit. It's okay if some of them fall apart. Sometimes grapefruit are even so cooperative that you can just peel the membrane off with your fingers. However you do it, just remove the flesh of the grapefruit and set it aside as well.
In a medium mixing bowl, combine flour, baking powder, baking soda, salt and half of grapefruit sugar mixture. Cut in butter with a pastry blender or two knives (or your fingers if you work fast and not too much) until flour mixture is crumbly and there are still tiny chunks of butter (about the size of small peas) in your flour mixture. Fold in honey, yogurt and grapefruit segments just until the mixture is combined and comes together. Drop by large tablespoonfuls a couple inches apart onto a greased cookie sheet (or if you want pretty, shaped scones, you can turn dough onto a floured surface, pat it out into a dish and cut wedges a la a pizza pie, then place evenly spaced apart onto greased cookie sheet). Sprinkle remaining grapefruit sugar evenly on top of scones, pressing lightly if needed. Bake at 425 degrees for 15-17 minutes or until golden brown on top. Allow to cool for about 10 minutes on baking sheet.
Recipe adapted from: Grapefruit, Honey and Yogurt Scones by Joy the Baker
Sunday, April 3, 2011
Lemon Butter Muffins
Mmmmm....muffins! Especially sunny lemon muffins topped with a tangy lemon glaze. These are simple to prepare and are the perfect balance of sweet and tart. And there's something about lemons that makes me think of Springtime. It must be the cheerful lemon yellow color. Bake up a batch to have with a lazy weekend breakfast or serve with brunch. They're sure to be such a hit that perhaps the saying should go, "When life hands you lemons, make lemon butter muffins."
Lemon Butter Muffins
Muffins:
6 tablespoons (3/4 stick) butter at room temperature
1/2 cup granulated sugar
1 large egg
1 cup milk
1 large lemon, zested and juiced
2 cups all purpose flour
1 tablespoon baking powder
1/2 teaspoon salt
Glaze:
1/2 cup powdered sugar
1-2 tablespoons lemon juice or milk
1 teaspoon fresh lemon zest
Preheat oven to 400 degrees F. Prepare 12 muffin cups with paper liners. Prepare the muffin batter. Place the butter and sugar in a medium sized mixing bowl. Blend with an electric mixer until mixture is fluffy, about 30 seconds. Add the egg, milk, 3 tablespoons lemon juice and 1 teaspoon lemon zest (reserve the rest for the glaze) and blend on low speed just until combined. Stop the machine and scrape down the sides of the bowl with a spatula. Combine flour, baking powder and salt and fold into wet ingredients, stirring just until combined. The batter will be a little lumpy. Spoon batter into muffin cups (each about 2/3 full). Bake at 400 degrees until the muffins are lightly golden and spring back when lightly pressed, 18-20 minute (you can also do miniature muffins just bake for 8-10 minutes). Remove from oven and allow to cool for 5 minutes in the pan. Remove muffins from pan and allow to cool another 15 minutes before glazing.
While the muffins are cooling, prepare the glaze. In a small bowl, stir together powdered sugar and 1 tablespoon of lemon juice or milk. Add more juice or milk, 1 teaspoon at a time, if needed, to make mixture pourable from a spoon. Stir in lemon zest. When muffins have cooled, spoon a teaspoon of glaze over each muffin and let them rest a few minutes to allow the glaze to set.
Recipe adapted from: "Cupcakes! By the Cake Mix Doctor," Anne Byrn (I really like her books and the chapter on muffins is one of my favorites--check it out!)
Wednesday, March 9, 2011
Mango Ginger Granola and Shortcut Greek-Style Yogurt
All I want to say about this post is that granola and Greek yogurt are two items that are pricey in the store and extremely easy and inexpensive to replicate at home. Give these a try, you won't regret it. They're becoming a staple in our house. Also, (as I am always the bargain-hunter) I wanted to share that the best deal on honey I've found is at Walgreens. Every few weeks they will sell a 32 oz. bottle for $3.99 with an in-ad coupon. Now that I've shared that, please leave some for me! Finally, this granola would make a great edible gift for someone. Put it in a pretty glass jar or cellophane bag and tie with a pretty ribbon. They'll be impressed!
Mango Ginger Granola
1/4 cup vegetable oil (canola)
1/4 cup agave syrup (or extra 1/4 cup honey)
1/4 cup honey
1 teaspoon ground cinnamon
1/2 teaspoon ground ginger
2 tablespoons packed brown sugar
1 teaspoon vanilla extract
3 cups old fashioned rolled oats (not instant)
1 cup chopped almonds (I just smashed whole almonds in a baggie with a rolling pin and really like the rustic texture that gave them but you can sub slivered or sliced)
2 tablespoons sesame seeds
2 tablespoons wheat germ
1/4 teaspoon salt
1/4 cup toasted sunflower seeds
1 cup diced dried sweetened mango (can substitute other dried fruit such as raisins, cherries, apricots etc. or a combination for other varieties)
Greek yogurt for serving (see note)
Preheat the oven to 325 degrees. Line a rimmed baking sheet with parchment paper or a silicone baking mat. Mix the oil, agave syrup, honey, cinnamon, ginger, brown sugar and vanilla in a small bowl, whisking until smooth. In a large bowl, stir together oats, almonds, sesame seeds, wheat germ and salt. Pour wet ingredients over dry and stir, making sure everything is evenly coated. Spread the mixture evenly over the prepared baking sheet. Bake at 325 degrees, stirring occasionally for 25-30 minutes or until golden brown. Remove the granola from the oven and allow to cool completely. Toss in diced mango (or other dried fruit) and sunflower seeds. Store in an airtight container. Serve with Greek yogurt (or milk, or over ice cream or handfuls right out of the container...).
Note on Greek yogurt: Greek style yogurt is much thicker and smoother tasting than traditional yogurt. Until a few years ago, I had never heard of the stuff, but now it is readily available and showing up in more major brands all the time. It's higher in protein than regular yogurt and I really love its "spoonability." That said, Greek yogurt is a bit pricey.
You can make your own cheaper, shortcut version by buying and straining containers of regular yogurt (of course you can make your own yogurt from scratch too, but let's not get to crazy today!).
To make shortcut Greek yogurt, line a fine-meshed sieve with a cheesecloth or paper towels and place over a bowl. Spoon regular yogurt (we usually do plain, any flavor or milk fat will do) from a large container into the lined sieve and place in the refrigerator.
Allow yogurt to sit until desired consistency (at least a couple of hours). The extra liquid will drip into the bowl underneath and the yogurt remaining will be thick and rich. If you let it go for more than a few hours, it will get almost as thick as cream cheese (actually called yogurt cheese and good for some uses, but probably not for eating with granola any more). Also, you can use the leftover liquid mixed with some milk in pancake batter.
Granola recipe heavily adapted from Bobby Flay's Mango Agave Granola
Mango Ginger Granola
1/4 cup vegetable oil (canola)
1/4 cup agave syrup (or extra 1/4 cup honey)
1/4 cup honey
1 teaspoon ground cinnamon
1/2 teaspoon ground ginger
2 tablespoons packed brown sugar
1 teaspoon vanilla extract
3 cups old fashioned rolled oats (not instant)
1 cup chopped almonds (I just smashed whole almonds in a baggie with a rolling pin and really like the rustic texture that gave them but you can sub slivered or sliced)
2 tablespoons sesame seeds
2 tablespoons wheat germ
1/4 teaspoon salt
1/4 cup toasted sunflower seeds
1 cup diced dried sweetened mango (can substitute other dried fruit such as raisins, cherries, apricots etc. or a combination for other varieties)
Greek yogurt for serving (see note)
Preheat the oven to 325 degrees. Line a rimmed baking sheet with parchment paper or a silicone baking mat. Mix the oil, agave syrup, honey, cinnamon, ginger, brown sugar and vanilla in a small bowl, whisking until smooth. In a large bowl, stir together oats, almonds, sesame seeds, wheat germ and salt. Pour wet ingredients over dry and stir, making sure everything is evenly coated. Spread the mixture evenly over the prepared baking sheet. Bake at 325 degrees, stirring occasionally for 25-30 minutes or until golden brown. Remove the granola from the oven and allow to cool completely. Toss in diced mango (or other dried fruit) and sunflower seeds. Store in an airtight container. Serve with Greek yogurt (or milk, or over ice cream or handfuls right out of the container...).
Note on Greek yogurt: Greek style yogurt is much thicker and smoother tasting than traditional yogurt. Until a few years ago, I had never heard of the stuff, but now it is readily available and showing up in more major brands all the time. It's higher in protein than regular yogurt and I really love its "spoonability." That said, Greek yogurt is a bit pricey.
You can make your own cheaper, shortcut version by buying and straining containers of regular yogurt (of course you can make your own yogurt from scratch too, but let's not get to crazy today!).
To make shortcut Greek yogurt, line a fine-meshed sieve with a cheesecloth or paper towels and place over a bowl. Spoon regular yogurt (we usually do plain, any flavor or milk fat will do) from a large container into the lined sieve and place in the refrigerator.
Allow yogurt to sit until desired consistency (at least a couple of hours). The extra liquid will drip into the bowl underneath and the yogurt remaining will be thick and rich. If you let it go for more than a few hours, it will get almost as thick as cream cheese (actually called yogurt cheese and good for some uses, but probably not for eating with granola any more). Also, you can use the leftover liquid mixed with some milk in pancake batter.
| it was a hit with the small one (as seen by his scraping the dregs...) |
Sunday, February 27, 2011
Ham and Spinach Strata
I love brunch foods. I love breakfast foods. I could eat morning foods anytime of day. This is a dish that is especially versatile. A strata is a savory egg casserole using day old (read: stale) bread and this time, it's filled with Mediterranean style flavors--spinach, red bell peppers, feta cheese and diced ham to make it even more substantial. The lovely thing about a strata is that it's begging for you to use any fillings you have on hand (read: a great way to use up leftovers--see my note below for some suggestions). Simple, economical and able to be assembled ahead and popped into the oven whenever you're ready, this is an excellent dish to keep in mind for upcoming brunch-centered celebrations (read: Easter, Mother's Day, Baby Showers) and also lazy Saturday mornings.
Ham and Spinach Strata
6 cups cubed (or torn into bite sized pieces) bread: day old French bread is lovely, croissants are elegant, you can even use leftover hot dog buns if that's what needs to be used up--sometimes they do!
2 tablespoons butter
1/2 medium onion, diced (about 1/2 cup)
1/2 red bell pepper, diced (about 1/2 cup)
1 12 oz. package frozen chopped spinach, thawed and drained
1/2 teaspoon garlic powder
salt and pepper
1 1/2 cups (1 8 oz package) shredded cheese (Italian blend is nice, feel free to experiment)
1/4 cup feta cheese (optional)
2 cups diced ham
8 eggs
1 cup milk or half and half
1/2 teaspoon dry mustard
Directions: Lightly grease a 9x13 baking dish. Spread half of the bread cubes in the bottom of the dish. Set aside. In a large saute pan, melt butter over medium high heat. Add onion, and saute, stirring occasionally, until slightly softened (2-3 minutes). Add bell pepper and saute for 2-3 minutes longer or until bell pepper is crisp-tender. Stir in chopped spinach and season with garlic powder, salt and pepper. Spoon spinach mixture evenly over bottom layer of bread pieces. Sprinkle cheeses over spinach layer and cover with remaining bread cubes. In a large bowl, beat together eggs and milk. Stir in dry mustard and season egg mixture with additional salt and pepper. Pour over casserole. At this point, you can cover with plastic wrap and refrigerate overnight.
When ready to bake, preheat oven to 350. Bake uncovered until puffed and golden, about 45-55 minutes.
note: Experiment with different combinations depending on what you have on hand: Chopped broccoli and cheddar cheese, breakfast sausage and mushrooms, asparagus and Swiss cheese, green chiles, corn and pepper jack...the possibilities are endless.
Sunday, October 31, 2010
Perfect Pancakes
Growing up, I never cared much for pancakes. I think that might have had something to do with the fact that the only kind of pancakes I ever had came from a box of Bisquick. No offense to my mom (or anyone else who prefers boxed pancake mixes), but I think these homemade pancakes taste way better than ones from a box (and are nearly just as easy to throw together as any coming from a "Mr. Hungry Jack" or "Aunt Jemima"). They're light and fluffy with a hint of sweetness from the vanilla. And should I mention again how easy they are (I bet you have all the ingredients just sitting in your pantry right now!)??? In fact, this recipe is even simple enough for a weekday. Or, you can do like we do (because we rarely have our act together on days we need to be out of the house early) and make a double batch on the weekend and then microwave the leftovers right out of the fridge (or freezer). You will rarely see a four year old as happy as when he can have pancakes just about any morning he wants!).
Perfect Pancakes
1 cup whole wheat flour
1 cup all purpose flour
2 tablespoons baking powder
1/4 cup sugar
1 teaspoon salt
2 cups milk
2 eggs, beaten
2 tablespoons vegetable oil
1 teaspoon vanilla
butter for greasing the griddle
Sunday, October 10, 2010
Recipe Mash Up: Breakfast Burritos
I know I am not alone when I say that I really enjoy the t.v. show, "Glee." I especially love episodes that have song mash up's--when they take a couple familiar songs and combine them in a clever way. This is what I would consider a mash up of some of the recipes I've posted in the past, and thus, this post has links galore (cleverness, I guess could be debated, but deliciousness is a sure bet!).
Wednesday, September 1, 2010
Chocolate Chip Bread Pudding
If you're anything like me, you anything that involves custard is an easy sell (and that's really what bread pudding is, a baked custard with bread in it). It's just one of those food buzz words that makes me immediately think I'll like it. A few more: caramel, goat cheese, spinach, artichoke, portabella mushrooms...(not together, mind you, but certainly any of those ingredients listed on a menu and I'm likely to order).
Anyway, in my constant quest to not let anything go to waste, I used last week's stale Kaiser rolls for this week's dessert (or a rather indulgent breakfast made out of the leftovers--I felt like Bill Cosby rationalizing chocolate cake for breakfast because it has nutritious things like eggs and milk in it. But really, guilt aside, it really is like a big French Toast casserole, so it's perfectly acceptable for this to appear for brunch. You hear that? You have my permission!). It tasted kind of like a chocolate croissant. And that, friends, should probably be added to my list of buzz words!
Chocolate Chip Bread Pudding
About 5 cups leftover, stale bread torn into bite sized pieces (a French-type bread or roll is good)
3 eggs
1/2 cup sugar
1 teaspoon vanilla
2 1/4 cups milk
1/2-1 cup chocolate chips (depending how chocolate-y you like it--I used a combination of milk chocolate and mini chips)
Whipped cream (optional)
Preheat oven to 350 degrees. Grease an 8x8 casserole dish and set aside.
In a large bowl, thoroughly beat eggs. Whisk in sugar and vanilla. Add milk and whisk until combined. Stir in bread pieces and toss just until bread is soaked through. Add chocolate chips, stir once more and then pour mixture into prepared pan. Bake uncovered for 45 minutes-1 hour, until a knife comes out clean and the bread pudding is golden brown and puffed around the edges. Serve warm, topped with whipped cream (or at room temperature, or cut into slivers directly from the fridge and furtively eaten while still standing in the open fridge).
Note: you can also cover this and refrigerate overnight if you want to make ahead of time for in the morning. Just allow for a longer baking time if it goes into the oven right from the fridge.
Additionally, you can substitute blueberries and cubed cream cheese for the chocolate chips if you'd like to take more of a "breakfast-y," French Toast Casserole approach. In that case, you might want to also cut down on the sugar and pass maple syrup for serving, but that's just me...
Subscribe to:
Posts (Atom)