Showing posts with label dessert. Show all posts

Monday, October 17, 2011

Chocolate Turtle Cake

Wow.  October has been flying by.  We've had a steady stream of company and a whole host of other things come our way in the last few weeks.  Consequently, there has not been as much cooking around these parts as eating out (or so it seems) and when I have been making food, there hasn't been a whole lot of attention paid to making sure to snap a pretty picture.

Sometimes, a recipe doesn't need a lovely shot to be enticing, though.  At least, that's what I would think when mentioning such a thing as Chocolate Turtle Cake.  While my parents were visiting, I really wanted to try out this recipe on them knowing that they have a weakness for the chocolate, caramel pecans combination.  I'm so glad I did (and especially glad there were extra people to help spread out the calories!).

Inspired by the beloved candy, this version consists of chocolate cake (use a box, if you please! I sure did.) is layered with gooey caramel and crunchy pecans, covered in rich chocolate frosting and then topped with a final dressing of caramel. 

Chocolate Turtle Cake
1/2 cup heavy cream
2 cups pecans, toasted
1 pound soft caramels (I used a 14 oz. bag of Kraft brand and it worked well despite not being quite 1 pound)
1/8 teaspoon salt
1 recipe Grandma Kaye's Fudge Frosting (recipe below) or 1 recipe Chocolate Icing (also below)
2 (8-inch) baked chocolate cake rounds

Directions: 
For the caramel: Finely chop 1 1/2 cups pecans.  Heat caramels, remaining cream and salt in a microwave safe bowl by cooking on 50% power in microwave, removing bowl and stirring every 30 seconds until caramel is smooth and melted.  Reserve 3/4 cup caramel mixture for topping.  Stir chopped pecans into remaining caramel mixture. 

To assemble: Place 1 cake layer on cake serving platter.  Spread the pecan-caramel mixture in an even layer over the top, leaving 1/2 inch border around the edges.  Pour a very small amount of chocolate frosting around the caramel filling to keep it from spilling over the edges (see photo).  Top with second cake layer.  Pour or spread chocolate frosting over top and sides of cake, allowing to set slightly.  Spread reserved caramel mixture over top of cake, allowing caramel to drip over sides (reheat caramel in microwave for just a few seconds if it has gotten too stiff to pour).  Garnish with remaining pecans.  Slice and serve
Making a "dam" of chocolate frosting to keep the caramel from spilling out.  Kindly disregard the very torn cake edges.  I was meant to relearn a lesson in properly greasing the cake pans.  Oops.

Note: the original recipe called for a chocolate ganache icing instead of the "Grandma Kaye's Fudge Frosting."  I changed it up mostly for the sake of time (the ganache has to cool for much longer).  If you would like to use it instead, I've included it below.

Grandma Kaye's Fudge Frosting
1 cup sugar
1/3 cup evaporated milk (you can also substitute half and half)
1/2 stick (1/4 cup) butter, cut into small pieces
1 cup mini marshmallows
a pinch of salt
1 teaspoon vanilla
1 cup milk chocolate chips (or a combination of milk and semi-sweet)

In a medium saucepan over very lowest heat, combine sugar and evaporated milk. Stir thoroughly until sugar starts to dissolve. Add butter and marshmallows. Stir constantly until butter and marshmallows are completely melted. Remove from heat and stir in salt, vanilla and chocolate chips, stirring until chips are melted and frosting is smooth. Use immediately as it will stiffen up quickly.

notes: after a lot of experimenting, I have found that it is very important to make sure to combine the milk and sugar first, otherwise the sugar crystals will never fully dissolve and your frosting will remain grainy. It is also important to keep the heat as low as possible. Finally, you can certainly play around with the chocolate used. We just prefer milk chocolate. 

Chocolate Icing:
1/2 cup heavy cream
6 ounces bittersweet chocolate, chopped
2 tablespoons light corn syrup
In a medium saucepan, cook cream, chocolate and corn syrup over medium-low heat, whisking constantly, until smooth.  Transfer mixture to medium bowl and refrigerate until thickened but still spreadable, about 2 hours, stirring occasionally (alternatively, refrigerate mixture overnight until set.  Let sit at room temperature until softened and spreadable, about 1 hour).

Recipe Adapted from: Cook's Country Magazine

Thursday, September 22, 2011

Low Fat Monkey Bread

 So I contemplated going on a fast from sugar for awhile.  That lasted about one day until I decided to make this.  I'm telling you, I think my relationship with sugar is borderline stronghold status.  Someday soon I probably ought to go cold turkey for awhile, but not today.

I'm not really sure why it is called Monkey Bread, it contains absolutely no monkey and no monkeys were harmed in the making of it.  Perhaps, it is because it is so easy maybe even a monkey could make it.

There are certainly a lot of versions of Monkey Bread out there and I think between the various sleepovers I went to as a kid, I've probably tasted a lot of them.  This is my favorite.  It's made with frozen bread dough and instead of using gobs of butter, you make a cinnamon caramel sauce on the stove with just a touch of butter, milk and (I admit, quite a lot of) sugar.

The Monkey Bread pictured is actually a half batch.  I made a full batch of the sauce, though, which meant I had leftovers to experiment with.  My initial research findings: it makes an excellent dip for sliced pears and when stirred into coffee with cream, it makes a darn close imitation of a Starbucks' Cinnamon Dolce Latte (the coffee that tastes like a cinnamon roll--how could you go wrong?). 

Monkey Bread
1 1/4 cup granulated white sugar, divided
1/4 cup packed brown sugar
1/4 cup milk
2 tablespoons butter
1 3/4 teaspoons ground cinnamon, divided
2 (1-pound) loaves frozen white bread dough, thawed (or 24 unbaked balls of dough for dinner rolls, cut into fourths)
cooking spray

Combine 1 cup granulated sugar, brown sugar, milk, butter and 1 1/4 teaspoons cinnamon in a small saucepan.  Bring to a boil, cook 1 minutes.  Remove sauce from heat; cool 10 minutes.

Combine 1/4 cup granulated sugar and 1/2 teaspoon cinnamon in a shallow dish, stir well.  Cut each loaf of dough into 24 equal portions.  Roll each portion in sugar mixture; layer dough balls in a 12 cup Bundt pan coated with cooking spray.  Pour sauce over dough; cover and let rise in a warm place, free from drafts 35 minutes or until dough has doubled in size.

Preheat oven to 350 degrees.

Uncover dough, bake at 350 degrees for 25 minutes or until lightly browned.  Immediately loosen edges of bread with knife.  Place a plate upside down on top of pan and invert bread onto a plate.  Drizzle any remaining syrup over bread.  Serve while still warm. 

Recipe Source: The Best of Cooking Light
P.S. I'm linking this recipe to The Frugal Girls Chic & Crafty Party! 

Sunday, September 18, 2011

Super-Soft Snickerdoodle Cookies

I tend to avoid making cookies for several reasons.  First, although they seem simple enough for a child to put together, they rely pretty heavily on exact measurements (something I tend to be a bit impatient for) to turn out.  Second, bite-sized desserts can be a bit of a pitfall around these parts.  Finally, if I'm going to eat a cookie, it needs to be soft.

I can maintain strong willpower against Oreos and Chips Ahoy, Nutter Butters and Nilla Wafers, but if you put a chewy cookie in front of me, I'm hard pressed to resist.  I am one to purposely underbake any cookie I make, but oftentimes, those don't even turn out very well.  Intentionally chewy cookie recipes are a bit of a holy grail for me. 

This snickerdoodle recipe not only turned out soft and delicious, but the cookies remained irresistibly chewy for days afterward.  With the faint hint of cinnamon and nutmeg, they hint of the holidays to come but feel very appropriate for Fall.  I'm thankful that half the batch went to a neighbor who just had a baby and another portion of the dough was frozen for later.  Otherwise, there would have been little willpower to keep me in check.

Super Soft Snickerdoodle Cookies
makes about 3 dozen cookies
1 cup (2 sticks) unsalted butter
1/2 cup dark brown sugar
1 cup white sugar
3-4 cups flour
1/4 teaspoon cinnamon
1/4 teaspoon nutmeg
1/4 teaspoon cream of tartar
1 teaspoon baking soda
1/2 teaspoon salt
3 eggs
1 teaspoon vanilla extract

For the cinnamon sugar:
1/4 cup white sugar
1 tablespoon cinnamon
1/4 teaspoon nutmeg

Heat the oven to 425°F. Gently melt the butter in a saucepan or in the microwave and let it cool while you mix the dry ingredients. Stir together the flour, spices, baking soda, cream of tartar and salt. Whisk the sugar into the cooled butter until smooth.  Stir in the eggs into the butter-sugar mixture and add the vanilla. Stir the wet ingredients into the dry ingredients, stirring just until it comes together, adding more flour as necessary until dough is able to be shaped into balls.
In a shallow bowl, mix together the white sugar, cinnamon, and nutmeg. Form small 1 1/2-inch balls of dough and roll them in the cinnamon sugar. Place them on an unlined, ungreased baking sheet and flatten slightly. Bake for 7 minutes then remove and let cool on the baking sheet for 5 minutes. Remove to a wire rack.
The dough can be refrigerated for up to 5 days, well-wrapped. It can also be frozen in logs.

Recipe Source: The Kitchn.com's Super Soft Snickerdoodle Cookies

P.S. After all this sugar, I am looking forward to posting soon about some really delicious and HEALTHY vegetarian burritos...this dessert thing has gotten a bit out of hand lately.  Thinking I need to rekindle my relationship with Jillian Michaels stat!

Thursday, September 15, 2011

Triple Chocolate Mousse Cake

Sometimes things are just meant to be.  From the library I checked out The Best of America's Test Kitchen 2010 Cookbook and this recipe's photo graced the cover.  A few days later, I happened to catch the episode of From America's Test Kitchen on PBS where they made this cake.  Two days ago, was my husband, Jay's birthday.  As if it were ordained,  I had to make this cake.  With the bottom layer a flourless chocolate cake, the middle a silky chocolate mousse and the top a light and creamy white chocolate mousse, how could you go wrong?

After showing him the picture from the cookbook, Jay thought it looked like the makings a pretty good birthday cake.  I was very happy to oblige, and even happier when I realized that I had everything to make the bottom layer, on hand and could crank that out the night before.

Despite the lengthy instructions, it was really quite simple and only required a bit of time.  It's definitely worth making for a special occasion.  Clearly, I need more practice in making sure the layers come out more even and working on my chocolate shavings (how wimpy did those turn out???), but it was met with rave reviews.  I don't think I'll mind having to work out the kinks in this one, especially when that includes getting to lick the bowl... : )

Happy Birthday, Honey!
Triple Chocolate Mousse Cake
Base Layer:
6 tablespoons (3/4 stick) unsalted butter, cut into pieces
7 ounces bittersweet chocolate
3/4 teaspoon instant espresso powder (Starbucks via works very well)
1 1/2 teaspoon vanilla extract
4 large eggs, separated
pinch salt
1/3 cup packed light brown sugar

For the middle layer:
2 tbsp. cocoa powder, preferably Dutch-processed
5 tbsp. hot water
7 oz. bittersweet chocolate, finely chopped
1½ cups heavy cream
1 tbsp. granulated sugar
Pinch of salt

For the top layer:
¾ tsp. powdered gelatin
1 tbsp. water
6 oz. white chocolate, finely chopped
1½ cups heavy cream

For garnish:
Chocolate curls or cocoa powder

Directions:
To make the bottom layer
, butter the bottom and sides of a 9-inch springform pan.  Center a rack in the oven and preheat to 325˚ F.  Combine the butter, chocolate, and espresso powder in a large heatproof bowl set over simmering water.  Stir occasionally until the mixture is smooth.  Remove from the heat and let cool slightly, about 5 minutes.  Whisk in the vanilla and egg yolks.  Set aside.

In a stand mixer fitted with the whisk attachment, beat the egg whites and salt on medium speed until foamy, about 30 seconds.  Crumble half of the brown sugar into the mixing bowl with your fingers to remove any lumps.  Beat until incorporated, about 15 seconds.  Add the remaining brown sugar and continue to beat on high speed until stiff peaks form, about 1 minute more.  Using a whisk, mix one-third of the beaten egg whites to the chocolate mixture to lighten it.  Fold in the remaining egg whites gently with a rubber spatula until no streaks remain.  Pour the batter into the prepared springform pan and smooth the top with a spatula.

Bake until the cake has risen, is firm around the edges and the center has just set but is still soft (should spring back after pressing gently with a finger), about 14-18 minutes.  Transfer the cake to a wire rack to cool completely, at least 1 hour.  Do not remove the cake from the pan.  (If not making the second layer right away, cover with plastic wrap and refrigerate until ready to proceed.)

To make the second layer, whisk together the cocoa powder and hot water in a small bowl; set aside.  Melt the chocolate in a heatproof bowl set over simmering water, stirring occasionally until smooth.  Once melted, remove from the heat and let cool slightly, 2-5 minutes.

In the clean bowl of a stand mixer fitted with the whisk attachment, whip the cream, sugar and salt on medium speed until the mixture begins to thicken, about 30 seconds.  Increase the speed to high and whip until soft peaks form when the whisk is lifted, 30-60 seconds.  Whisk in the cocoa powder
mixture until smooth.  Using a whisk, mix one-third of the whipped cream to the chocolate mixture to lighten it.  Fold in the remaining whipped cream gently with a rubber spatula until no streaks remain.  Pour the mousse into the springform pan over the cooled cake and tap gently on the counter 3 times to remove air bubbles.  Gently smooth the top with a spatula.  Wipe the inside edge of the pan to remove any drips.  Refrigerate for at least 15 minutes while preparing the top layer.

To make the top layer, sprinkle the gelatin over the water in a small bowl and let stand at least 5 minutes to soften.  Place the white chocolate in a medium bowl.  Bring ½ cup of the cream to a boil in a small saucepan.  Remove the pan from the heat, add the gelatin mixture and stir until dissolved.  Pour the hot cream mixture over the white chocolate and let stand about 1 minute.  Whisk until the mixture is smooth.  Cool to room temperature, about 5-8 minutes, stirring occasionally.

In the clean bowl of a stand mixer fitted with the whisk attachment, whip the remaining 1 cup of cream at medium speed until it begins to thicken.  Increase the speed to high and whip until soft peaks form when the whisk is lifted, 30-60 seconds.  Using a whisk, mix one-third of the whipped cream to the white chocolate mixture to lighten it.  Fold in the remaining whipped cream gently with a rubber spatula until no streaks remain.  Spoon the white chocolate mousse into the pan over the middle layer.  Smooth the top with an offset spatula.  Return the cake to the refrigerator and chill until set, at least 2½ hours (Also, make sure not to cover your finished cake with plastic wrap as it will stick to the top and mess up the pretty smooth surface).

Remove from fridge preferably 20 minutes before serving (I didn't do this and it was ok, just a little messy to cut).  To serve, run a knife around the edge of the spring form pan and gently remove sides of pan.  Top with chocolate curls or cocoa powder to garnish.  To slice as cleanly as possible, dip a knife into hot water and wipe off immediately before making each slice.


Cake can be made and stored a day ahead.

Recipe Source: The Best of America's Test Kitchen 2010 Cookbook

I'm linking this recipe to Cast Party Wednesday--Check it out for some great recipes ideas!

Monday, September 12, 2011

Hot Fudge Sauce

When I was a kid, when my mom would buy a jar of Mrs. Richardson's Hot Fudge Sauce, we knew something special was up--guests were coming.  I thought that was a pretty awesome treat, but sometime after I left the house, she started making her own from scratch and now, she's known to press still-warm jars of the chocolaty goodness into friends' hands as a part of the "Long Minnesota Goodbye" process.  She has also cranked out batches to give as Christmas gifts.  She's a good mom.

Taking less than 15 minutes and using mostly stuff that's already hanging out in the pantry, there's no reason not to try your hand at making this classic dessert sauce.  Warm and drizzled over ice cream or cake or fruit (even stirred into coffee!), you can't go wrong.  Pour the extras into empty jars and keep in the fridge to be ready for cold spoonfuls to be indulged in at a moment's notice.

Rich and Gooey Hot Fudge Sauce
2/3 cup heavy cream
1/2 cup dark corn syrup
1/3 cup granulated sugar
1/4 cup unsweetened cocoa powder
1/4 teaspoon salt
2/3 cup chocolate chips or good quality bar chocolate, chopped (I used combination of Ghiradelli dark and milk chocolate chips)
2 tablespoons butter
1 teaspoon vanilla extract

Stirring constantly with a wooden spoon or a spatula, bring the cream, corn syrup, sugar, cocoa powder and salt to a boil in a medium sauce pan over medium high heat.

Reduce the heat and cook at a low boil, stirring occasionally for 3 minutes.  Remove from heat and stir in chocolate chips, butter and vanilla and stir until smooth.

Cool sauce to warm and serve over ice cream, brownies, cake, fruit, stirred into coffee etc.

Note: sauce can also be poured into jars and kept refrigerated for up to a week.  Reheat in the microwave for about 30 seconds or until pourable. 

Recipe adapted from Rich and Gooey Hot Fudge Sauce from Serious Eats
P.S. I'm linking this recipe to Cast Party Wednesday--Check it out for some great recipes ideas! 

Wednesday, August 10, 2011

Watermelon Granita

When it comes to fruit, I have to admit I'm a tad bit particular picky.  For me to want to eat it, fruit can not be overripe.  A speck of brown on a banana?  It's now in bread or smoothie territory.  I want my grapes to snap as I bite into them and my peaches to still be crisp.  Watermelon is no exception.  If it's getting the least bit squishy, I'm going to start avoiding it.

Conflicting with this snobbery (and perhaps redeeming it!), I loathe to waste food.  There must be some latent Depression-era mindset in me because I try my darndest to convert any scrap of leftovers into something edible.  Oftentimes (fortunately!), out of the sheer effort to not throw something away, a new and exciting dish emerges.  Enter this Watermelon Granita recipe.

This refreshing watermelon slush is a perfect use for some extra (and extra ripe) watermelon.  Aafter trying, you might even start buying watermelon specifically for this purpose!).  By the way, "Granita" is really just a fancy word for slushy.  There is no need for  any special equipment besides a blender or food processor (and a fork) and the hands on time is minimal.  What a delicious way to help  beat the heat that we've all been experiencing so much of these days!

Watermelon Granita
4 cups seedless watermelon, rind removed and cut into chunks
juice of 1 lime (about 2 tablespoons)
1/4 cup granulated sugar

In a blender or food processor, combine watermelon, lime juice and sugar.  Blend until smooth.  Pour liquid into a wide shallow pan (like a 9x13" glass baking dish or one of those extremely helpful reusable plastic storage containers).  It will look a bit foamy on the top.  Place pan in freezer (carefully so you're not cleaning up watermelon juice from your kitchen floor).  Allow to freeze for about an hour.  Remove and using a fork or the back of a spoon, scrape the sides where the mixture is beginning to freeze.  Return to the freezer and repeat every hour or so a couple more times until mixture is completely slushy and shaved (it's also ok to do all the scraping after the mixture is frozen--it's really not too much harder).  Cover with plastic wrap until ready to serve by spooning into glasses.

Adapted from Pioneer Woman's Watermelon Granita

Thursday, July 28, 2011

Cherry Rhubarb Crisp

In case you haven't noticed, I have just the tiniest bit of a sweet tooth (no kidding).  It's terrible and a habit I wish I could break (not really, I am afraid).  It was especially bad during my pregnancies--I believe I still have a few of the Milky Ways I enjoyed during that time plastered to my middle.  Although it's abated somewhat, I still have to end the evening with something just a tiny bit sweet.  I'm not picky, it doesn't even have to be extravagant. 

A crisp is one of the simplest desserts around and it goes together extremely quickly.  Despite its rather humble place in the dessert world, I don't think you can go wrong with a sweet fruit filling topped with buttery, brown-sugar crumble.  Since we've had an abundance of fresh fruit in the house, I decided a crisp was in order. 

It can be varied in the topping and filling based on what you have on hand.  I was feeling nostalgic about my Grandma Lois' Cherry Rhubarb Jam (I'll have to get my hands on and share that recipe) and thought I'd give that Cherry Rhubarb combination a spin.  Feel free to substitute another fruit: blueberries, peaches, blackberries, apples, you get the idea...

Cherry Rhubarb Crisp
3 cups pitted cherries
3 cups rhubarb, trimmed and sliced (frozen is fine)
1/4 cup brown sugar, packed
1 tablespoon all purpose flour
1 tablespoon fresh lemon juice
1/2 teaspoon almond or vanilla extract, optional
2/3 cup all purpose flour
1/2 cup packed brown sugar
1/2 cup regular oats
3/4 teaspoon ground cinnamon
1/4 teaspoon ground nutmeg
pinch of salt
4 1/2 tablespoons chilled butter or stick margarine, cut into small pieces
whipped cream, vanilla ice cream or frozen yogurt for serving (we did a splash of half and half because that was what was in the house at the time)

Directions:
Preheat oven to 375 degrees F.  Spray a medium sized baking dish (11x7 or 8x8-inch recommended) with cooking spray.
Add fruit, 1/4 cup brown sugar, 1 tablespoon flour, lemon juice and almond extract in baking dish and stir to combine. 
In a medium bowl, stir together flour, 1/2 cup brown sugar, oats, cinnamon, nutmeg and salt.  Cut in butter with a pastry blender or two knives until the mixture becomes like coarse meal.  Sprinkle over the fruit mixture. 
Bake at 375 for 30 minutes or until bubbly and beginning to turn golden on top. 
Top each serving with whipped cream or ice cream. 

Recipe adapted from: The Best of Cooking Light, Blueberry Crisp a la Mode
Note:  This is a very basic crisp recipe.  You can add other things to make it more personal:
I have been known to use whatever odd bits of granola (or crumbled up granola bars), the mangled gingersnaps at the bottom of the bag, lonely graham cracker pieces, chopped nuts etc. I have lying around to make a crisp--just stir those extra bits in with the flour and oats (or in place of the oats) before adding the butter (using more butter if necessary).

Sunday, July 17, 2011

S'Mores Bars


Last weekend, we got to attend my husband's Family Reunion in Southern California.  It was a really wonderful time, and as part of the gathering, we got to have a beach bonfire (Huntington Beach, Surf City USA, baby!).  No bonfire is complete without S'mores, and I can't think of a better way to enjoy them than against the backdrop of the roaring Pacific and a setting sun, but this recipe is a close second.

Although these are indoor s'mores, you won't feel like you're settling (and you won't go to bed smelling like a campfire).  Jay, my husband, who doesn't even like traditional s'mores can't keep his hands off of them.  Personally, I think the addition of the butter and brown sugar and a dusting of sea salt takes these to a whole 'nother level...


S'Mores Bars
12 (5x2 1/2 inch) Graham Crackers
3/4 cup (1 1/2 sticks) butter
3/4 cup firmly packed brown sugar
3 miniature marshmallows
1 cup chocolate pieces (about 4 chocolate bars, broken into pieces or milk chocolate chips)
sea salt for sprinkling, optional

Heat oven to 350 degrees.  Line 15x10x1inch jelly roll (or cookie sheet with edges) with aluminum foil leaving a 1-inch overhang on ends.  Spray foil with cooking spray.  Place graham crackers onto foil so sides touch.

Melt butter and brown sugar in medium saucepan over Medium heat, stirring constantly, until smooth and mixture just comes to a boil, abotu 5 minutes.  Pour evenly over crackers.

Bake 5-6 minutes or until bubbly.
Remove pan from oven; sprinkle with marshmallows and chocolate pieces.  Continue baking until marshmallows begin to soften, about 2 to 3 minutes.  Sprinkle with a fine dusting of sea salt, if desired.  Cool completely.  Lift from pan using foil.  Cut into bars.

Source: Back of Market Pantry (Target) Brand Honey Graham Crackers

Monday, July 4, 2011

Cherry Pineapple Dump Cake


 Happy 4th of July!  I hope everyone had a lovely day.  Even though the day has passed, I thought I would share a quintessential pot luck dessert.  A few processed ingredients "dumped" (hence the name) together never tasted so good.  You can have all of the ingredients on hand and throw it together at the last minute.  There are all sorts of variations out there--feel free to substitute another fruit for the cherry pie filling and I included the option of adding pecans and coconut, although I am a purist and leave them out.  Keep the ingredients on hand for when you need to throw together a quick dessert!  


Cherry Pineapple Dump Cake
1 can (21 ounce) cherry pie filling
1 can (15 ounce) crushed pineapple in juice
1 box yellow cake mix
1 stick (8 tablespoons butter)
1/4 cup water
1/2 cup chopped pecans (optional)
1/2 cup shredded coconut (optional)
vanilla ice cream, whipped cream or Cool Whip for serving

Preheat oven to 350 degrees.  Spray a 9x13 baking dish with cooking spray.  Pour cherry pie filling in bottom of baking dish.  Spread out evenly.  Drain juice from pineapple and set aside.  Spread crushed pineapple over top of pie filling.  Sprinkle dry cake mix evenly over fruit mixture.  Melt butter and combine with reserved pineapple juice.  Stir in water and pour liquid over top of cake mix.  Do not stir.  If desired, sprinkle with pecans and coconut.  Bake at 350 degrees for 35-40 minutes or until golden brown.  Serve warm or at room temperature with a scoop of vanilla ice cream or a dollop of whipped cream or Cool Whip. 

Recipe Adapted from "The Cake Mix Doctor" by Anne Byrn

Monday, June 27, 2011

Boston Cream Cupcakes

After awhile of deliberation (and thinking about all the clever things I might say about Boston Cream Cupcakes), 
I decided these cupcakes don't need much of an introduction.    
Here goes:
Cake.  Good.
Vanilla Custard.  Good.
Chocolate.  Good.
Topped with a cherry.  All very good.
 
This is not the first appearances for recipes of both the pastry cream and chocolate ganache (you can see them featured in such posts as cream puffs and strawberry pie--as long as you promise not to make too much fun of my terrible photography).  I think the moral of the story is that it can be really satisfying to have a few recipes up your sleeve that can be reworked in so many different ways.  Here's to a mash up.  Of sugar.  Sweet. 

p.s. These seem like they might make a cute addition to a 4th of July celebration.  There's something a bit patriotic feeling about them.

Boston Cream Cupcakes
1 batch yellow cupcakes
1 batch pastry cream
1 batch chocolate ganache
maraschino cherries for garnish
To assemble: Use a serrated knife to slice the tops of the cupcakes off right where they meet the paper liner.  Spread a generous amount of pastry cream on the base of the cupcake.  Replace the top of the cupcake and dip the top or spread a thick layer of the chocolate ganache on the top of the cupcake.  While ganache is still wet, top with a maraschino cherry.  Store leftovers in the refrigerator (the cold cake with the cream is really fabulous).

Cupcakes:
1 box yellow cake mix (I used butter recipe golden)
1 stick (4 ounces/8 tablespoons) butter, softened
1 cup sour cream
1/2 cup warm water
4 eggs

Preheat oven to 350 degrees.  Line muffin tins with paper liners.  In a large bowl, combine cake mix, butter, sour cream eggs and water.  Mix on low speed until thoroughly combined.  Stop mixer and scrape down sides of bowl.   Mix on medium speed for about 2 minutes.  Spoon batter into paper liners and bake according to cupcake directions on box.  Remove from oven and allow to cool completely. 

Pastry Cream Filling
Note: For a full box of cake mix worth of cupcakes (about 18-24), prepare a double batch.  This will fill about 12
2 cups milk or half and half
1/2 cup sugar, divided
pinch salt
3 tablespoons corn starch
3 egg yolks
1 teaspoon vanilla

In a medium sauce-pan, combine milk, 1/4 cup of sugar and salt.  Bring milk to a simmer over medium heat, stirring frequently. 

While milk is coming to a simmer, combine remaining sugar and egg yolks in a medium bowl.  Stir in corn starch, one tablespoon at a time, until fully incorporated and mixture is thick and lemon-colored. 

Slowly add a ladle-full of steaming milk to egg mixture, stirring constantly, to help temper the egg mixture (brings up the temperature of the egg mixture slowly so you don't get scrambled egg yolks).  Continue to add remaining milk, slowly and stirring constantly.  When all of milk is added, return entire mixture to the sauce-pan and stirring constantly, bring to a boil over medium heat.  Allow to boil (still stirring) for 1-2 minutes or until mixture is thick.  Remove from heat.  Stir in vanilla. 

Pour pastry cream into a shallow dish and place a piece of plastic wrap directly on the surface to keep from forming a skin on the top.  Allow to fully chill in the fridge.

You can also use pastry cream recipe for cream pies and other pastries!

Chocolate Ganache
1/2 cup heavy cream
2 cups good quality chocolate chips or bar chocolate chopped into small pieces (I like a combination of milk and dark chocolate, personally)

In a small, microwave-safe, bowl, heat heavy cream until it comes to simmer (about 30 seconds-1 minute--watch very closely so it doesn't boil over!).  Remove from microwave and stir in chocolate.  Stir constantly until chocolate is fully melted and mixture becomes thick and shiny.  Use immediately.  If mixture becomes too hard, microwave on high for 15 second intervals, stirring well until softened.


 And for your (mostly my) enjoyment...
Notice the little hand creeping in the background...

Yoink!

Maraschino cherry bliss...

Wednesday, June 22, 2011

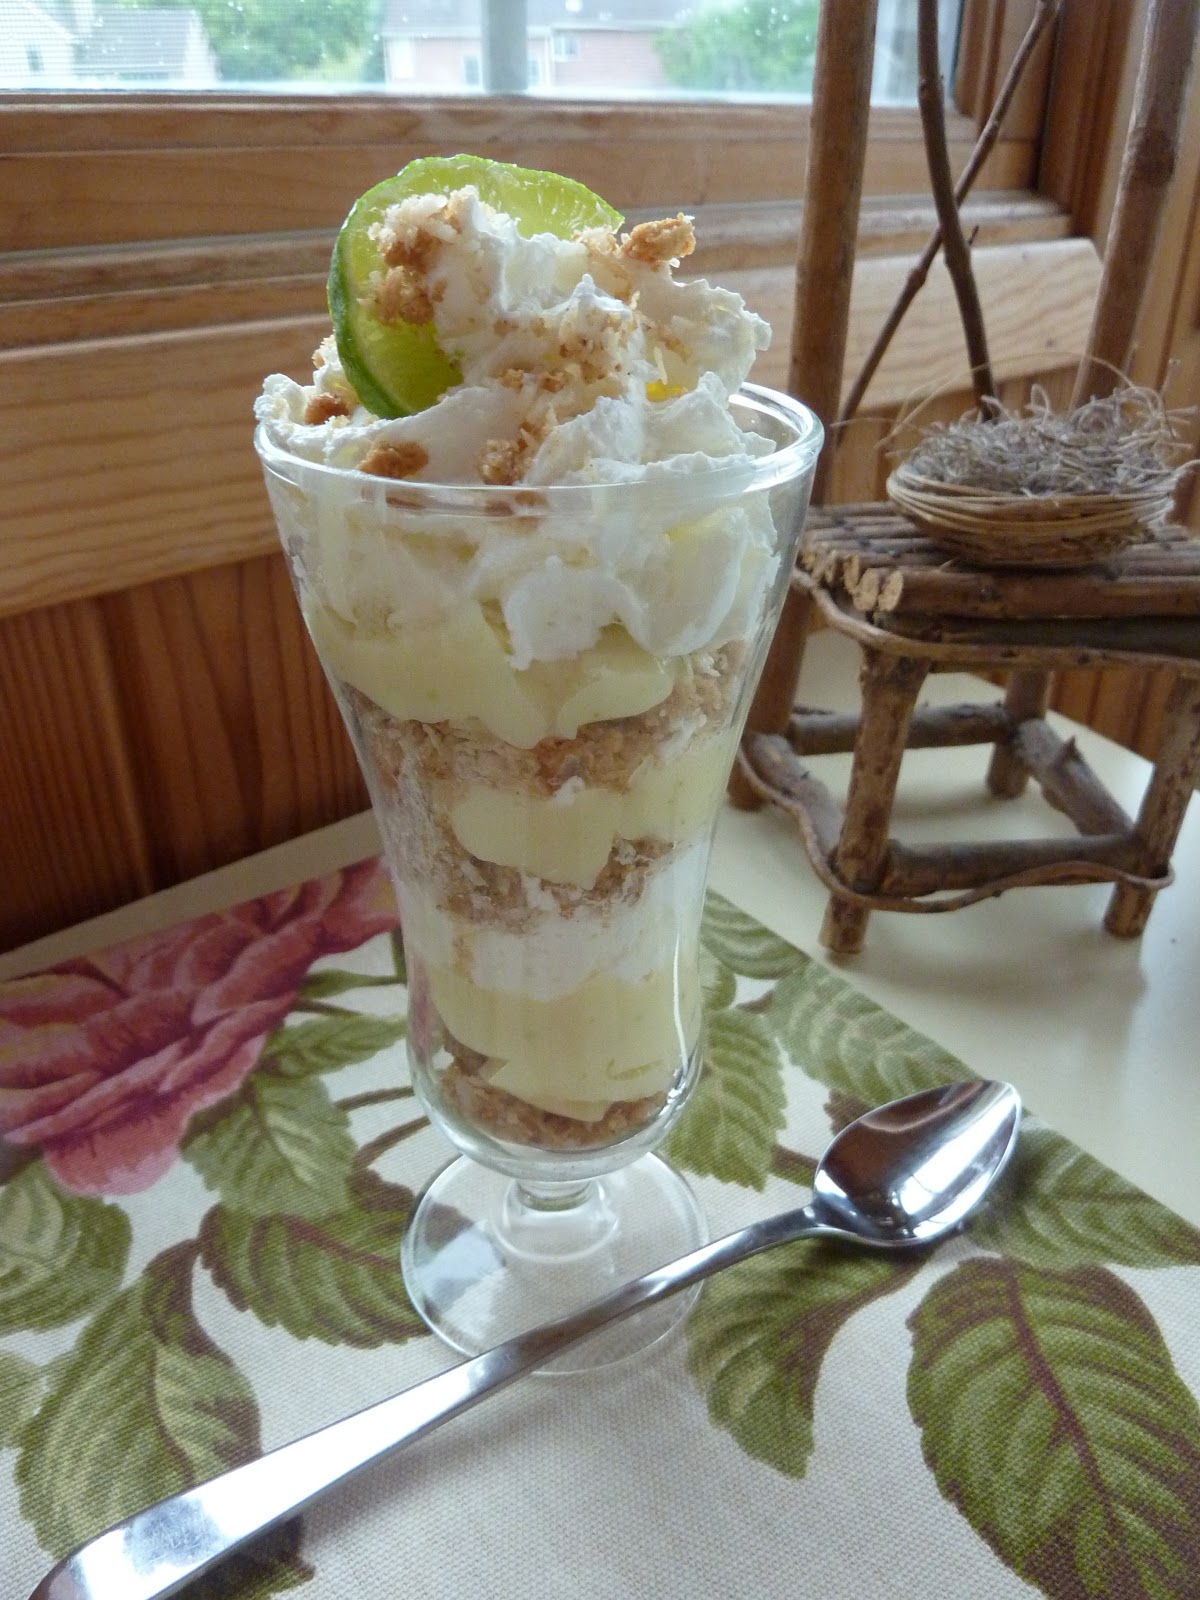
Coconut Lime Custard Parfaits


Sometimes recipes with very good intentions fail miserably.  Then, like a phoenix rising out of the ashes, they are reborn and soar.  This is one of those dishes.  Seeing a whole bunch of limes sitting on my parents' counter, I set out wanting to make a coconut lime pie.  Without a recipe, I started guesstimating and both the graham cracker-coconut crust and the coconut milk-lime filling didn't turn out quite the way I was hoping.  The crust was too crumbly and I had doubt that the filling would set up enough to be able to be sliced into a pie.  The moral of the story is that it's okay to improvise.  When we layered the filling and crumbled crust with whipped cream, these made for delicious enough desserts that everyone licked their dishes clean and is fighting over the leftovers.  Be encouraged to turn your culinary missteps into a new hit!  

pay no attention to the strange, small chair in the background...that's just a bonus feature of my mom's house...
Coconut Lime Custard Parfaits:
Coconut Lime Custard Filling:
2 tablespoons cornstarch
1/2 cup sugar
1 can coconut milk (about 14 oz)
1/4 cup freshly squeezed lime juice
3 egg yolks
1 tablespoon lime zest

Coconut Graham Cracker Crust Crumble Layer:
2 cups graham cracker crumbs (about 6-7 whole sheets)
1 cup shredded coconut (mine was unsweetened from the health food store, but you can use sweetened instead)
4 tablespoons butter, melted

Whipped Cream for serving
thin slices of lime for garnish, if desired

Directions: 
Preheat oven to 350 degrees.  Make graham crackers into graham cracker crumbs.  I like to do this by putting them into a gallon sized ziplock bag and whacking the heck out of them but a food processor would work nicely as well.  Stir in coconut and then pour in melted butter.  Once thoroughly mixed, pat mixture into a pie pan and bake at 350 degrees for 15-20 minutes or until crust is golden brown.  Remove from oven and allow to fully cool.  Break into pieces if using as a crumble.

To make filling, place egg yolks in a small bowl and stir until smooth.  In a medium sauce pan, stir together sugar and corn starch.  Whisk in can of coconut milk and lime juice.  Stirring constantly, bring mixture to a boil over medium heat.  Once boiling, remove from heat and stir tablespoonfuls, one at a time, into the egg yolks (adding the hot mixture to the egg yolks slowly while stirring constantly is called "tempering" and it is done to prevent you from getting scrambled eggs).  Once you have added about half of the coconut mixture into the egg yolk mixture, pour the egg yolk mixture into the pan and return to medium heat and stir constantly until mixture again reaches a boil.  Pour into a wide shallow dish (or on top of cooled pie crust recipe if you're wanting to be daring--it did actually set up fairly well) and place a piece of plastic wrap directly on top of filling.  Chill in the fridge.

To assemble parfaits:
In a tall glass, layer crumble, filling and whipped cream as desired.  Garnish with additional crumbs from the crumble and slices of lime, if you like!

Tuesday, June 14, 2011

Fresh Mint Chocolate Chip Ice Cream

 
Recently,  (see Virgin "Mojito" Slush) I posted on how I was the beneficiary of some fresh mint--seriously, folks, I not not shy about receiving hand-me-downs (ingredients and otherwise!), if you have any you'd like to cast off, I'm your girl!  Anyway, I spent some time thinking up ways I could use said mint and since I had half a quart of half-and-half (leftover from how I take my coffee: cream, no sugar) languishing in the fridge, I felt some Fresh Mint Chocolate Chip Ice Cream was in order.

My experience with mint chocolate chip takes me back to the fluorescent stuff served at my brother's birthday parties.  This mint chip is a little more understated.  The mint flavor is subtle, but refreshing and creamy with bursts of chocolate.  If you haven't made homemade ice cream before, don't be turned off.  It's really easy and you'll feel so satisfied with your accomplishment (and knowing exactly what went in there).  If you don't have an ice cream maker, see my note below on a make-shift version using an ice cube tray and a blender!

Fresh Mint Chocolate Chip Ice Cream
2 cups half and half
about 10 fresh mint leaves (still on the stems are ok...you're just steeping them)
1/2 cup sugar
2 tablespoons cornstarch
1 cup cream (I used whole milk because that's what you have with a one-year-old in the house)
1/2 cup semi-sweet miniature chocolate chips
more fresh mint for garnish


Put the half and half in a sauce pan over medium-high heat and bring just to a boil, stirring.  Add the mint leaves and allow to steep in the hot milk for 20 minutes.  Remove mint leaves.
Mix the cornstarch with 2 tablespoons of milk to make a slurry (a thick liquid where all the cornstarch is dissolved so that you don't get little cornstarch "beads").
Whisk cornstarch mixture into warm minty half and half along with sugar.  Return to medium-high heat and stir constantly until thick.  It will be done when the mixture thickly coats the back of a spoon and a line drawn with your finger remains intact. Stir in the remaining cream or milk.
Allow to cool, then freeze in an ice cream machine according to the manufacturer's directions.  When ice cream is almost completely frozen, stir in the chocolate chips.  Garnish with fresh mint as desired.

Note: if you don't have an ice cream maker--or do but can not find the paddle anywhere and suspect perhaps your child squirreled it away somewhere--you can do a B team version of ice cream.  Pour the cooled mixture into an ice cube tray and freeze completely.  Put the frozen cubes into a blender, add a splash of milk to help blend things up (adding more as needed).  Blend until mixture is thick and smooth.  Stir in the chocolate chips and serve right away as depending on how much milk you added, it may more closely resemble a "Fresh Mint Chocolate Chip Shake."  This style also doesn't refreeze as well, so act fast!

Wednesday, June 1, 2011

Double Chocolate Oatmeal Cookies


This is a nostalgic recipe.  My mom would make this cookie a lot while we were growing up.  It's one of those recipes that we were always bound to have the ingredients on hand.  She'd throw a batch together by memory as we were getting ready for school and the first tray would be out of the oven and into our lunch boxes before we ran out the door to catch the bus.  On those days, we'd come home to rows of the chewy, chocolatey oatmeal cookies cooling on the counter.  How she didn't eat them all while we were away and they were sitting out like that, I'll never know, but they were always a welcome sight!


Double Chocolate Oatmeal Cookies:
1 1/2 cups sugar
1 cup (2 sticks or 16 tablespoons) butter softened or margarine
1 egg
1/4 cup water
1 teaspoon vanilla extract
1 1/4 cup flour
1/3 cup baking cocoa
1/2 teaspoon baking soda
1/2 teaspoon salt
3 cups quick cooking rolled oats
1 cup milk chocolate chips

Preheat oven to 350 degrees.  In a large mixing bowl, cream together butter and sugar.  Add egg, water and vanilla and mix thoroughly until fully combined.  In another bowl or on a piece of waxed paper, sift together flour, cocoa, baking soda and salt.  Stir into wet ingredients and mix just until a soft dough is formed.  Stir in oats and chocolate chips.   Drop cookie dough by tablespoonfuls about 1" apart onto an ungreased cookie sheet.  Bake at 350 degrees for 9-12 minutes or until cookies are set, but centers are still soft (not wet).  Remove from oven, allow to cool 5 minutes on cookie sheet, then remove with a spatula and transfer onto a cooling rack or layers of paper towels to finish cooling.  Makes about 3 dozen cookies.

Tuesday, May 31, 2011

Mini Pineapple Muffins with Coconut Crumble


And, while I'm on a tropical theme (see the last post on Key Lime Bars)...
Last week, I needed to throw together a baked good (and something that I actually had ingredients in my pantry for) for my Bible study girls quickly!  I came across the concept of a pineapple muffin with coconut crumble and I'm so glad I gave these a try!  These sweet little muffins are buttery but still light and the pineapple makes them moist.  The coconut crumble topping adds a perfect, caramel-y, crunch to the soft muffin underneath.  The mini size was perfect for toddlers and mommies alike and there were plenty to go around.  If you don't have access to a mini muffin pan, don't despair, you can bake them regular size too, just increase the baking time to 18-20 minutes!


Pineapple Muffins:
3/4 stick (6 tablespoons) butter, softened
1/2 cup granulated sugar
1 large egg
1/2 cup milk
1 cup crushed pineapple in juice, undrained
1 teaspoon vanilla extract
2 cups all purpose flour
1 tablespoon baking powder
1/4 teaspoon salt
Coconut Crumble
1/2  cup brown sugar, packed
2 tablespoons reserved flour mixture
1 tablespoon butter, softened
1/2 cup sweetened shredded coconut

Preheat oven to 400 degrees.  Spray mini muffin tin with cooking spray (or fill cups with paper liners).  Set aside.

In a small bowl, stir together flour, salt and baking powder.  Remove 2 tablespoons of mixture and reserve for crumble.  Set aside remaining flour mixture for later.

To prepare crumble, stir together brown sugar, 2 tablespoons flour mixture and butter with a fork until butter is worked in and mixture is crumbly.  Stir in coconut and set the mixture aside.
 
For muffin batter, in a medium mixing bowl, cream together 6 tablespoons softened butter and sugar.  Beat until fluffy.  Add in egg, milk, pineapple with juice and vanilla.  Blend together just until combined.  Scrape down sides of bowl with a spatula and fold in the flour mixture, stirring just until combined.  The batter will still be lumpy.  Spoon or scoop by tablespoons into prepared muffin tins. Sprinkle teaspoons of crumble topping on each muffin and press down gently.  Place muffin pan in the oven.

Bake for 12-14 minutes or until muffins are golden brown and spring back when lightly pressed with a finger.  Remove from oven and allow to cool for a few minutes.  Use a butter knife around the edge of each muffin to remove if necessary.  Serve warm or at room temperature.

Recipe Adapted from: "Cupcakes! From the Cake Doctor" by Anne Byrn

Thursday, May 26, 2011

Key Lime Bars


Last night I had a run in with a trampoline and the trampoline won.  Today has been spent "icing and elevating" my very swollen ankle (I think I'd much rather be icing cupcakes).  I'm very thankful to my husband and in-laws who are taking care of things with my two small rug rats.  I'm also thankful that I have several recipes already in the wings to share because I'm not sure when I'll be getting downstairs to the kitchen again...

As we are approaching Memorial Day Weekend (thank you so much to the brave men and women who have served us!), my mind thinks on BBQ.  Obviously, BBQ-ing can mean very different things to different people depending on where in the country you hail from, but one thing is certain.  The accompaniments to a cook out are equally important.  These key lime bars are tart and refreshing, a perfect ending to a backyard bonanza. 

Note: the recipe calls for key lime juice.  Key limes are very small, yellow-green limes that make the pie famous.  If you can't find key limes, by all means, substitute the more common, larger and greener Persian Lime (the one that we all know and love).  You can also swap in lemon juice to make lemon bars if those are more your thing...


Key Lime Bars
Crust:
1 stick (4 oz, 8 tablespoons) butter, softened
1/4 cup powdered sugar
1 cup all purpose flour
pinch of salt

Filling:
3 eggs, lightly beaten
1 cup granulated sugar
3 tablespoons all purpose flour
1/4 cup freshly squeezed key lime juice
1 tablespoon freshly grated lime zest
powdered sugar for garnishing

Preheat oven to 350 degrees.  Grease an 8x8 baking dish with cooking spray.  In a medium mixing bowl, with electric mixer, blend together butter and powdered sugar.  Once thoroughly mixed, add flour and salt, mixing until a stiff dough is formed.  Press into prepared pan and bake, until crust is lightly golden, about 20-25 minutes.  Remove from oven and allow to cool.

Meanwhile, prepare filling.  Beat together eggs and sugar until smooth and lemon-colored.  Mix in flour and beat until smooth.  Whisk in lime juice and zest.  Pour into baked crust and return to oven, baking for an additional 25 minutes or until filling is set.  Allow to cool completely before cutting into bars.  Dust with powdered sugar for garnish and top with tiny lime slices, if desired. 

Recipe closely adapted from Pat and Gina Neely's Key Lime Bars

Monday, May 16, 2011

Ice Cream Affogato


Hello, Coffee?  Meet Ice Cream.  That, my friends, is "Affogato" (which means "drowned" in Italian).  To be precise, I suppose it really means espresso (which is technically hot water forced through tightly packed coffee grounds at high pressure to produce an intense, bittersweet and creamy-tasting little sip of coffee) poured over gelato (dense Italian-style "ice cream").  But, we have the crummiest espresso maker known to man (and that was even before the tamper disappeared--probably dumped in the trash by a helpful toddler).  Thankfully, I can make strong coffee and I am sure more of you have a coffee maker than an espresso maker anyway!

This is a lovely, impromptu dessert that despite its simplicity is elegant and delicious.  I always loved coffee ice cream and this combines the bitter and acidity of the strong coffee with the creaminess of ice cream.  Also, you can play with the ice cream flavors.  Vanilla is certainly a classic but the pictures  feature Sweet Chai Latte flavored ice cream (a new flavor by Haagen Daz which I am having a hard not plowing through because it is so awesome).  Chocolate also would be yummy for those of you who are Mocha fans. 


Ice Cream Affogato:
serves 4
1 pint high quality ice cream, any desired flavor that would go well with coffee
4 small cups very strong brewed coffee or espresso (2-4 ounces a piece)

Just before serving, scoop ice cream into individual bowls or large coffee mugs.  Serve coffee or espresso alongside each bowl for each person to pour over their ice cream.  Enjoy immediately.

*Also, adding a small amount of liqueur (such as amaretto or Frangelico etc.) to each adult serving  would fancy things up a bit, if you'd like.  Just add to the ice cream alongside the coffee.

Inspired by recipe from Martha Stewart's Dinner at Home

Monday, May 9, 2011

Rhubarb Crumble Coffee Cake


Sheesh, I've been lazy when it comes to posting lately.  My apologies if anyone noticed.  I was finishing up a lovely time in Minnesota with my family (except for the fact that it actually had the gall to snow on the first two days of May...falling into such stereotypes, Minnesota, I'm so disappointed in you...).  We are back to normal life but I have one more recipe that I made while back there (and utilizing my mom's vast selection of dishes and coordinating linens, which I will miss...).  It involves one of my favorite Springtime ingredients, rhubarb. 

Speaking of, I have a tragic story involving rhubarb coffee cake.  I've mentioned before how I was involved in 4-H (see my post on Samoas bars--and yes, I realize samoas come from girl scouts, that just was where I remembered I had put in a teaser about this event...).  Anyway, 4-H makes a big deal about entering items you worked on for exhibition at fairs.  Well, I didn't raise animals and didn't build bird houses, or sew, or make handicrafts or partake in photography.  What I did like to do was bake and so the summer I was eight, I planned to enter a Rhubarb Cake in the Hennepin County Fair with the goal of winning a blue ribbon.

One steamy June day, the time for judging arrived.  I had painstakingly prepared my cake with rhubarb harvested from my father's garden, hand crumbled the cinnamon streusel and baked the cake to perfection.  It was time to go and we were running late, as usual.  My mom loaded myself, my brother, my sister and two neighbor kids she watched into our '87 Grand Caravan (almond colored with the awesome faux wood paneling on the side, of course).  In the chaos that is loading five children into a vehicle, the cake, unfortunately, remained on the roof of the minivan.  We took off down the alley and I don't remember if I suddenly realized my lap was devoid of a potentially prize winning cake or if we heard the sound of it smashing on the cement behind us, but needless to say, there was no blue ribbon in the cards that year. 
So sad.

The recipe for that fateful cake has disappeared, but my love for rhubarb never will.  Here is a winner of a recipe (ha ha)!  Big cinnamon-y crumbs over top of vanilla cake dotted with sweet-tart pieces of rhubarb.   I made it with whole wheat flour to reduce the guilt factor.  For best results, avoid alleys and old school minivans and possibly enjoy with some vanilla ice cream or a dollop of whipped cream.


Rhubarb Crumble Coffee Cake
Rhubarb Filling:
1/2 pound rhubarb, trimmed and cut into 1/2 inch pieces
1/4 cup granulated sugar
1/2 teaspoon ground ginger
1 teaspoon cornstarch

Cinnamon Crumble:
1/3 cup brown sugar
1/3 cup granulated sugar
1 teaspoon cinnamon
1/2 teaspoon ground ginger
1/2 teaspoon salt
1 stick butter (8 tablespoons or 4 ounces), melted
1 1/2 cups whole wheat pastry flour (can substitute all purpose flour just fine, I was just trying to be healthy)

Cake batter:
1/3 cup sour cream or Greek yogurt
2 large eggs
2 teaspoons vanilla extract
1/3 cup granulated sugar
4 tablespoons butter, melted
1 cup whole wheat pastry flour (again, you can substitute)
1/2 teaspoon baking powder
1/2 teaspoon baking soda
1/4 teaspoon salt

Directions: Preheat oven to 350 degrees.
In a small bowl, mix together sugar, corn starch and ground ginger from the rhubarb filling ingredients list.  Toss in rhubarb, stir to coat rhubarb in the sugar mixture and set aside.

To make cinnamon crumble, mix together in another bowl the brown and white sugar, cinnamon, ginger and salt.  Stir in melted butter and mix until thoroughly combined and sugar starts to dissolve.  Stir in flour with a spatula or wooden spoon.  It will feel like a stiff dough.  Set aside in one big mass.

In one final bowl (are you running out of dishes yet? I'm sorry, it will be worth it), stir together sour cream, eggs, vanilla extract and sugar until smooth.  Combine together flour, baking powder, baking soda and salt and add into wet ingredients, gently stirring just until combined.  Fold in rhubarb sugar mixture.  Pour into a greased 8x8 baking dish.  Using your fingers, break cinnamon crumble mixture into large crumbs and sprinkle evenly across top of cake batter.  Bake for 35-45 minutes, or until toothpick comes out clean of wet batter (it might be a bit moist if you stick a piece of rhubarb).  Serve warm or at room temperature.  Ice cream or whipped cream garnish, optional.

Recipe Adapted from Big Crumb Coffee Cake by Smitten Kitchen

Monday, May 2, 2011

Maple Almond Butter Cookies


This was a recipe I wasn't completely sold on.  Sure, I was intrigued by the idea, something like a peanut butter cookie but made with almond butter (not to be confused with a "butter cookie" with almonds...although now that I mention it, that sounds interesting too, I now have visions of little Dutch windmill cookies dancing through my head). 

The vegan batter tasted pretty good (no raw eggs to contend with so the dough was fair game!) and I don't think I could make a much healthier cookie if I tried.  But when they came out of the oven, I was disappointed.  They just weren't as good as I was hoping and I figured that it would just go in the "misses" pile. 

That was last night. 

This morning, I thought I should give them one last try.  Wow.  The cookies were soft, nutty and just slightly maple-y sweet.  I had to make myself stop after one knowing I'd already eaten breakfast (although these are so healthy, they could actually pass as a "breakfast cookie").  I'm starting to think of new variations I could play around with--adding some chopped dates or orange zest, dried cranberries or some cinnamon, substituting honey (not vegan) or agave for the maple syrup...there's a lot of potential in these power-packed bites!


Maple Almond Butter Cookies
makes 18-20 cookies
1/2 cup creamy natural style almond butter (could also try it with peanut butter)
1/2 cup maple syrup
2 tablespoons vegetable oil (I used the oil on the top of the jar of the almond butter that I couldn't stir back in and that worked well!)
1/2 teaspoon vanilla extract
1/2 teaspoon almond extract (or just just double the amount of one or the other)
1/2 cup whole wheat pastry flour (you could try white flour, it would just be less nutritious or regular whole wheat flour for an even more rustic cookie)
1/2 teaspoon baking soda
1/2 teaspoon salt
1/2 cup chopped almonds (I used some "Almond Accents" brand sliced toasted almonds)

Preheat oven to 350 degrees F.  In a medium mixing bowl, stir together almond butter, syrup, oil and extracts.  In a separate bowl (or let's be honest, I hate to make extra dirty dishes so I just threw the dry ingredients on top of the wet and mixed them together carefully before stirring the whole mess together--there's a reason why I can be a bit hit and miss in my baking), stir together dry ingredients and then stir into almond butter mixture, stirring just until combined.  Roll heaping teaspoons into balls, place about 2 inches apart on a cookie sheet.  Flatten slightly.  Bake 8-10 minutes or until firm on the edges, but still soft.  Remove from oven and cool completely.  Taste even better the next day! 

Recipe source: Sweet+Natural

Wednesday, April 20, 2011

Grapefruit Drop Scones

A couple weeks ago, I thought myself very lucky to have been gifted a very giant bag of citrus fruit fresh from Arizona.  Does it strike anyone else as ironic that there are a ton of grapefruit grown in a state where there is a large, ahem, "mature" population who uses medication prone to dangerous reactions with grapefruit?  Apparently, there are RV parks down there where people can not even give  grapefruit away.  So many grapefruit left uneaten...so sad...

Anyway, now that a couple of weeks have passed, we ran out of steam using the grapefruit and until this morning, a couple were still languishing in my fruit bowl.  I am such a hypocrite.  Determined to use them and needing to bake up something for my Bible study this morning, I came across a recipe for Grapefruit Scones and was intrigued.  They ended up light and tender, and had just a hint of grapefruit flavor hidden in their flakey, biscuit-y goodness.  I made drop scones (instead of the recognizable triangular shape) because the dough ended up pretty sticky, and what can I say, I'm lazy like that.


Grapefruit Drop Scones
2 small-ish grapefruit or 1 large beast of a grapefruit
1/4 cup granulated sugar
1 1/2 cups all purpose flour
1 teaspoon baking powder
1/2 teaspoon baking soda
1/4 teaspoon salt
6 tablespoons butter
2 tablespoons honey
1/2 cup plain yogurt

Preheat oven to 425 degrees F.
Remove zest from grapefruit and place in a small bowl.  Add sugar and stir together to make really lovely, fragrant grapefruit sugar.  Set aside.  Cut the remaining peel off of the grapefruit and lop off the top and bottom to show a nice, naked grapefruit.  Using a small paring knife, cut out segments by running your knife along the lines of the membrane out of the grapefruit.  It's okay if some of them fall apart.  Sometimes grapefruit are even so cooperative that you can just peel the membrane off with your fingers.  However you do it, just remove the flesh of the grapefruit and set it aside as well.

In a medium mixing bowl, combine flour, baking powder, baking soda, salt and half of grapefruit sugar mixture.  Cut in butter with a pastry blender or two knives (or your fingers if you work fast and not too much) until flour mixture is crumbly and there are still tiny chunks of butter (about the size of small peas) in your flour mixture.  Fold in honey, yogurt and grapefruit segments just until the mixture is combined and comes together.  Drop by large tablespoonfuls a couple inches apart onto a greased cookie sheet (or if you want pretty, shaped scones, you can turn dough onto a floured surface, pat it out into a dish and cut wedges a la a pizza pie, then place evenly spaced apart onto greased cookie sheet).  Sprinkle remaining grapefruit sugar evenly on top of scones, pressing lightly if needed.  Bake at 425 degrees for 15-17 minutes or until golden brown on top.  Allow to cool for about 10 minutes on baking sheet. 

Recipe adapted from: Grapefruit, Honey and Yogurt Scones by Joy the Baker

Tuesday, April 19, 2011

Carrot Cake


Last week was my Father-in-Law's Birthday.  He loves carrot cake and for the last several years, this is the recipe for the cake I've made for him.  It's a purist's carrot cake: no nuts, no raisins, no pineapple, no coconut.  Carrot cake, pure and simple.  And, after trying a lot of carrot cakes over the years, I have to say this one is my favorite.  Another plus is that it is the only carrot cake I've ever tried that doesn't feel greasy or heavy.  Thank you, Alton Brown, your cake recipe is a winner!  This would make a really lovely addition to your Easter (or another Springtime celebration).  Also, for a really impressive presentation (and serious, cake-eating crowd), double your cake and frosting recipes for a two-layered mammoth of a carrot cake. 

Carrot Cake
makes one 9 inch cake
12 oz carrots, peeled and grated, medium grate (approx. 6 medium carrots)
2 1/2 cups flour
1/2 teaspoon cinnamon
1/4 teaspoon allspice
1/4 teaspoon nutmeg (freshly grated, if possible)
1 teaspoon baking powder
1 teaspoon baking soda
1/2 teaspoon salt
1 cup white sugar
1/2 cup brown sugar
3 large eggs
6 ounces (2/3 cup) plain yogurt
1 teaspoon vanilla extract
6 ounces (2/3 cup) vegetable oil
cream cheese frosting, recipe follows

Butter and flour a 9 inch cake or spring form pan and line with parchment or waxed paper cut to fit in the bottom.  Set aside.  Preheat oven to 350 degrees.  In a food processor (which by the way is a lovely way to grate the carrots if you happen to have one), combine flour, spices, baking powder, baking soda and salt.  Pulse for about 5 seconds to combine thoroughly.  If you do not have a food processor (and had to painstakingly grate those carrots by hand), just stir together the dry ingredients in a large bowl.  Add the carrots and toss flour mixture and carrots together until carrots are coated with the flour mixture.

In the bowl of the food processor (or in a blender if you didn't have the food processor--they really are great kitchen tools, though!), combine the sugars, eggs, yogurt and vanilla extract.  With the processor or blender running, slowly drizzle in oil.  If you are really unfortunate and have neither food processor nor blender, combine all the wet ingredients in a bowl, mixing well.  Then, slowly drizzle in oil mixing continuously.  The important thing here is to get a good emulsion (where the oil is incorporated into the other ingredients--think like shaking up a salad dressing).  That will get you an ungreasy carrot cake.  Pour this mixture into the carrot mixture and stir just until combined.  Pour into prepared pan and bake at 350 degrees F. for 45 minutes.  Then, lower oven temperature to 325 degrees for another 20 minutes or until toothpick comes out clean.

Remove the pan from the oven and allow to cool in the pan for about 15 minutes.  Turn cake out onto a cooling rack and allow to cool completely.  Frost with cream cheese frosting after cake is completely cooled.

Cream Cheese Frosting:
1 8 oz. package Reduced Fat cream cheese (or regular, I just was trying to cut back where I could), softened to room temperature
1/2 stick (4 tablespoons) butter, softened to room temperature
1 teaspoon vanilla extract
2 cups powdered sugar

With an electric mixer, beat together cream cheese and butter in a large bowl until well combined.  Mix in vanilla extract.  Slowly add powdered sugar in small increments (about 1/2 cup at a time), beating after each addition.  Beat until smooth and fluffy.  Allow frosting to chill in the fridge for about 10 minutes before frosting the cake.

*Also, some helpful frosting tips: a cold cake is easier to frost than a room temperature one.  Wrap your cake in plastic wrap and freeze overnight or chill in the fridge beforehand.

If desired, you can just generously frost the top of a carrot cake for a rustic appearance.  For a more polished look, frost the entire cake.  For easiest results, frost a chilled cake with a very thin layer of the frosting (a "Crumb Coat") to ensure you don't get all kinds of crumbs in your frosting.  Chill crumb coated cake in the fridge for at least 10 minutes and then cover with additional, thicker layer of frosting for a finished cake. 

Recipe heavily adapted from Alton Brown's Carrot Cake